
Cooking With Collin: Almond Flour Herb Crackers & Parsley Pesto Dip with Walnuts
So I am super excited, as I’ve got 2 new Paleo Friendly recipes to share with you! I made these for a little Super Bowl get together we had with my sister and her family yesterday and they were a hit! In fact, even if I wasn’t eating Paleo, I would still be munching on these yummy recipes.
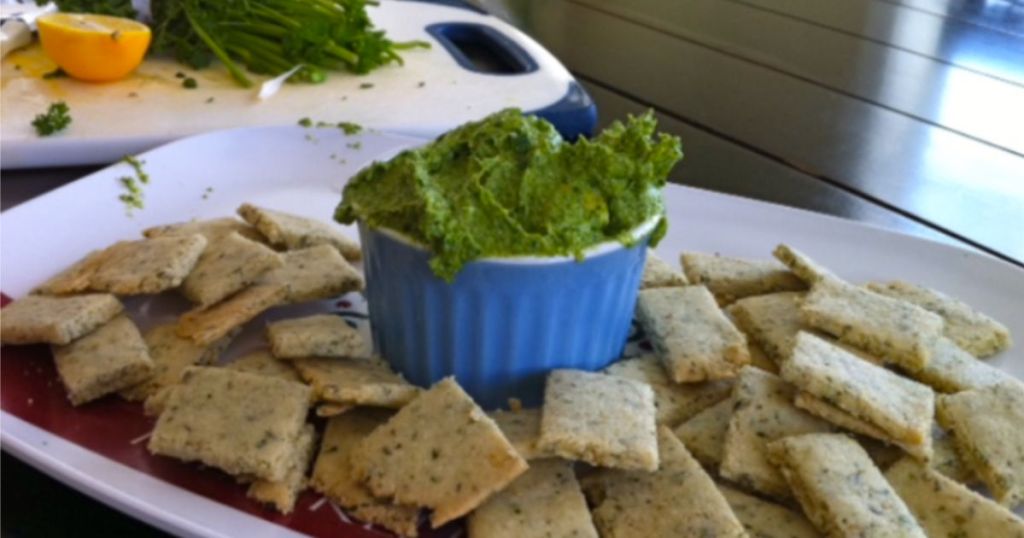
The first recipe is for Almond Flour Herb crackers that are so delicious… seriously, you can’t go wrong with this simple and easy to make recipe. Also, this recipe requires very little ingredients – which I love.
Almond Flour Herb Crackers
Easy recipe to make delicious appetizer or snacks with almond flour.
Ingredients
- 2 Cups Almond Meal/Flour
- 4 Tablespoons of various dried herbs that you have on hand (I used dried Thyme, Oregano, and Cilantro)
- 1 teaspoon salt (or 1/2 teaspoon if you are trying to consume less salt)
- 2 tablespoons water
- 1 tablespoon Olive Oil
Directions
1
Preheat oven to 350 degrees.
2
Combine Almond flour, all of the dried herbs, and salt in a bowl and mix. In a separate bowl, whisk together olive oil and water for a few minutes.
3
Combine the olive oil/water mixture in the bowl with the almond flour and herbs.
4
Stir until combined… I used my hands at the end.
5
Roll dough into a ball and place between 2 sheets of parchment paper.
6
Press down with your fingers and spread out until about 1/8 inch thickness.
7
Remove top piece of parchment paper and transfer bottom piece with rolled dough onto baking sheet.
8
Now cut dough into small squares with pizza cutter.
9
Bake at 350° for 9-11 minutes and then let crackers cool.

Recipe adapted from Elana’s Pantry.
…And if you’d love an indulgent dip to have with these delicious crackers, you’ve got to make this next recipe! I’m going to call this Parsley Pesto Dip with Walnuts! It’s seriously one of the best dip recipes and no need for chips. Just dip in the scrumptious crackers I highlighted above or even cut up carrots and celery – they make great dippers too! 😀

Parsley Pesto Dip with Walnuts
Ingredients:
3/4 cup chopped green onions
2 cups chopper parsley
1 clove garlic
3/4 teaspoon salt (or less?)
1 lemon
1/3 cup olive oil
1 cup walnuts
Place green onions, parsley, garlic and salt in a Vitamix (or blender or food processor) and blend until combined. Drizzle in the juice from one lemon and the olive oil. Slowly incorporate until fully blended. Now add in the Walnuts and blend. That’s it!

So yummy!
Recipe also adapted from Elana’s Pantry.


looks delish and healthy! can the crackers be made with any type of flour?
Ya… I am sure they can. I’ve only made these with Almond flour due to this flour being Paleo friendly. I also love how it makes the crackers taste. Yum! 🙂
I had no clue almond flour existed.. thank you for the recipe! Please post more like this 🙂
I’ve been using Elana’s Pantry recipes for almost a year now. She’s right about using the “right” almond flour. Tried Bob’s Red Mill, but end result is not satisfactory. Started purchasing product online. Elana has suggestions for vendors on her website. Superior results with the “right” product. Love her recipes! And LOVE hip2save, too!
yum thanks!!!
YUM! I’ve made homemade crackers before and they’re super delicious, too. I’m going to make these. Keep it up, Collin, you’re rockin’ the Paleo thang! 😉
Can you add a recipe tab to the top of the page so I can find them more easily? Thank and keep them coming!
What an awesome suggestion 🙂
Hey guys,
Click on the orange “Click to View All Categories” link on the upper right hand side and in the drop down you’ll be able to choose “Cooking With Collin”. Hope that helps!
I’m considering the Paleo diet; thanks for the recipes!
Both vegan recipes! Perfect!
Can you provide ingredients (amts) for dough! Do you spread herb mix on dough before baking?
I used about 4 Tablespoons total of dried Thyme, Oregano, and Cilantro. I then mixed these in the first step with the almond flour.
Thanks for the cracker recipe! I love to try new things but to be honest if the recipe has lots of steps & too many ingredients I end up not trying it out. This is just right & I will be making the crackers! Can’t wait to try them! 🙂
I’m doing Paleo also! Have been for about 5 months. I’ve lost about 25 pounds, back to high school weight!! Collin are you doing Crossfit as well?
Yep… well, I guess I should say that I’m trying to! 😉
I think as long as you show up and are doing the WOD (no matter how scaled) you still are a crossfitter! Way to go! I love the recipes, keep them coming please.
Are the crackers gluten free? I would assume they are, but not sure.
Yep! 😀
WOO HOO… They hubby was just advised to go onto this diet. We both have to lose quite a bit of weight and after a week and a half of Paleo/Primal we are both down 5lb and gaining muscle. I am taking longer than he is with completely dropping carbs though, he went “cold turkey”.
The crackers look yummy I bet they would be good on their own too.
I’m wondering what brand of almond flour you use and if you’ve found any good deals. I’ve started doing some pricing and it’s SOOO expensive!
I’ve purchased Bob’s Red Mill before and I recently purchased another bag from Vitacost.
https://www.vitacost.com/FunFresh-Foods-Gluten-Free-California-Almond-Flour
I’ve also had pretty good luck finding great deals on these types of products in the Amazon Warehouse section.
Thanks for the info! I really appreciate it! I know on Elana’s Pantry she advises against using Bob’s Red Mill because it’s not fine enough, so I’ve been hesitant to purchase it. I saw you linked to it but wasn’t sure that’s what you used. You’d recommend it, though? The final product LOOKS good. 🙂
you can also make your own almond flour. maybe find some deals on almonds w/planters or emerald?
basically you blanch the almonds then pops the skins off. let them cool and then grind them up in the food processor. just be careful not to over do it, or you end up with almond butter! 🙂
I was at Sprouts today (Like a Sunflower Market), and they had almond flour in their bulk section. It was $4.99/ lb. (Lone Tree, CO)
Jami- I LOVE Sprouts! Do you know of a coupon blog that features them?
Yes! The one that I have found/ used is Bargain Blessings.
I’ve seen it at Trader Joe’s, but have never tried it so I don’t know if it is good or not.
Awesome!! I would love to see more Paleo recipes!!
Wow, wow! I am drooling looking at the pictures. These recipes look great and super healthy! I’ve always wanted to try and make my own crackers & never knew how simple it could be! Thank you Collin!!
The Parsley Pesto recipe lists scallions AND green onions; they’re the same thing. Is this supposed to be 1¼ C of green onions?
Oopsie! That was a typo. I used about 3/4 cup of chopper green onions.
can you use almond flour as a substitute for other things? like pancakes? i didn’t know of such a thing either, super excited!
Yep… you sure can! Stay tuned for pancake recipe in the near future. 🙂
I have never heard of your diet, sounds interesting. I was on one called the Specific Carb Diet. It uses lots of almond flour. If you go here https://www.scdrecipe.com/recipes-breakfast/nancys-waffles you can find recipes for a lot of recipes that I am sure you can adapt, or leave alone to go with your diet (less trial and error since the ingredients are so expensive.) I was on SCD for health reasons, but you do loose weight. Lots of free recipes or other information for cooking with almond or other nut flour and some for “coconut flour” too. All gluten free for those with gluten sensitivities.
:O Waffles… they are what the hubby misses most. I have to try to use this for waffles.
Thanks Collin-this recipe looks super tasty AND simple. Will be giving it a try as soon as I get my Vita-Mix this month (super excited). Looking forward to making my own almond flour. 🙂
Looks good, but I have to say I’m more awed by what looks like a BEAUTIFUL hardwood floor, lol! Funny how we all have different perspective!
Oh, I’m looking forward to trying both of these recipes. This last year I found that I am allergic to wheat, egg whites and a few other things. I haven’t been good about it and am now paying for it. (Lots of itching!)
Looking forward to more recipes from you 🙂
These look great! I am SO excited to try them!! Thanks for sharing 😉
Thank you thank you thank you!! I was just diagnosed with celiac disease and have been missing out on my favorite snacks. I’m new to the diet so I’ve just been eating chicken, veggies, eggs, and protein drinks. This will help me get started in adding variety to my very boring diet now!!
Just wanted to say I found a Paleo Pizza recipe yesterday on youtube. The gentleman in the video is also using Bob’s red mill almond flour. I have almond flour on my grocery list today. I think the Paleo diet sounds great and am getting ready to give it a try! Here is the link. Hope you all enjoy! https://www.youtube.com/watch?v=Nntl_m66ieg
Thank you for posting these recipes. I’m gluten free and they look absolutely delish!
Collin, I made your “Squash Hash” for dinner the other night and we loved it!! Thank you for sharing your creation!
I’d never heard of Paleo/primal diets until I saw an earlier post of yours. Looking at these recipes makes me wonder if the diet is possible with nut allergies in the house?
Does anyone else find healthy eating to be expensive?! We are on a tight budget these days due to some unexpected plumbing issues in our house. I would love trying healthier recipes but every time I have to go buy an ingredient, I feel like I’m spending too much money on one recipe!
Cabbage is $ 0.49 lb., carrots about the same price, I shop in small markets (CA) it is much cheaper and saves me time and coupon head ache.
.49 cent/lb for carrots?! I live in TN which has a low cost of living and I can’t find carrots anywhere near the cheap.
Collin you are HIP! Love love love that you share awesome stuff like this.
You can use RAW almonds rather than almond meal/flour. Soak your almonds overnight (called “sprouting” to remove the enzyme inhibitor in nuts) then blend/chop them in a food processor with the other ingredients. To keep the food “alive” these crackers can be completed in a food dehydrator at 110 degrees until dry. Enjoy!
Shouldn’t the almond flour be soaked as well to avoid the enzyme inhibitors? I know it would make it too moist for cooking unless something was added like corn starch.
Collin, I just wanted others to know.. the website : Read it Forward… is great. I entered to be chosen to receive a book and was told twice I was not chosen. But was never notified regarding the book: Lady Almina and the Real Downton Abbey
…but received it in the mail today..I hear the series is very nice on PBS.. so wanted to thank you for the all the tips on getting the freebies.. I look forward in reading it and also start seeing the series that I have heard about on television weekly..
So you may not always be notified prior to getting your free book….what a treat..
thnx again for all you do… JOY
Collin,
I too have had to change up my diet. It has been a bit difficult to transition to Gluten free/Paleo/Dairy free diet. But with the help of my Holistic Dr and a lot of online help as well as help from friends, I am learning a lot. It is amazing how much weight you lose when your body can’t handle the greasy hamburgers and processed foods any longer. I have some suggestions since you are in Boise Id again. Fred Meyers has a great selection of gluten free, dairy free, and organic foods. If you are wanting to stay away from gluten more there is also Jake’s Gluten free on Fairview. There is so much information out there regarding these diets and I am still learning. Let me know if you need further information. Again, so glad that you are local now.
Anne Y
(old grade shool friend)
By the way I am totally trying this recipe…..looks yummy!
Thank you Collins for all your hard work and dedication to helping others. Your website has been a blessing!