
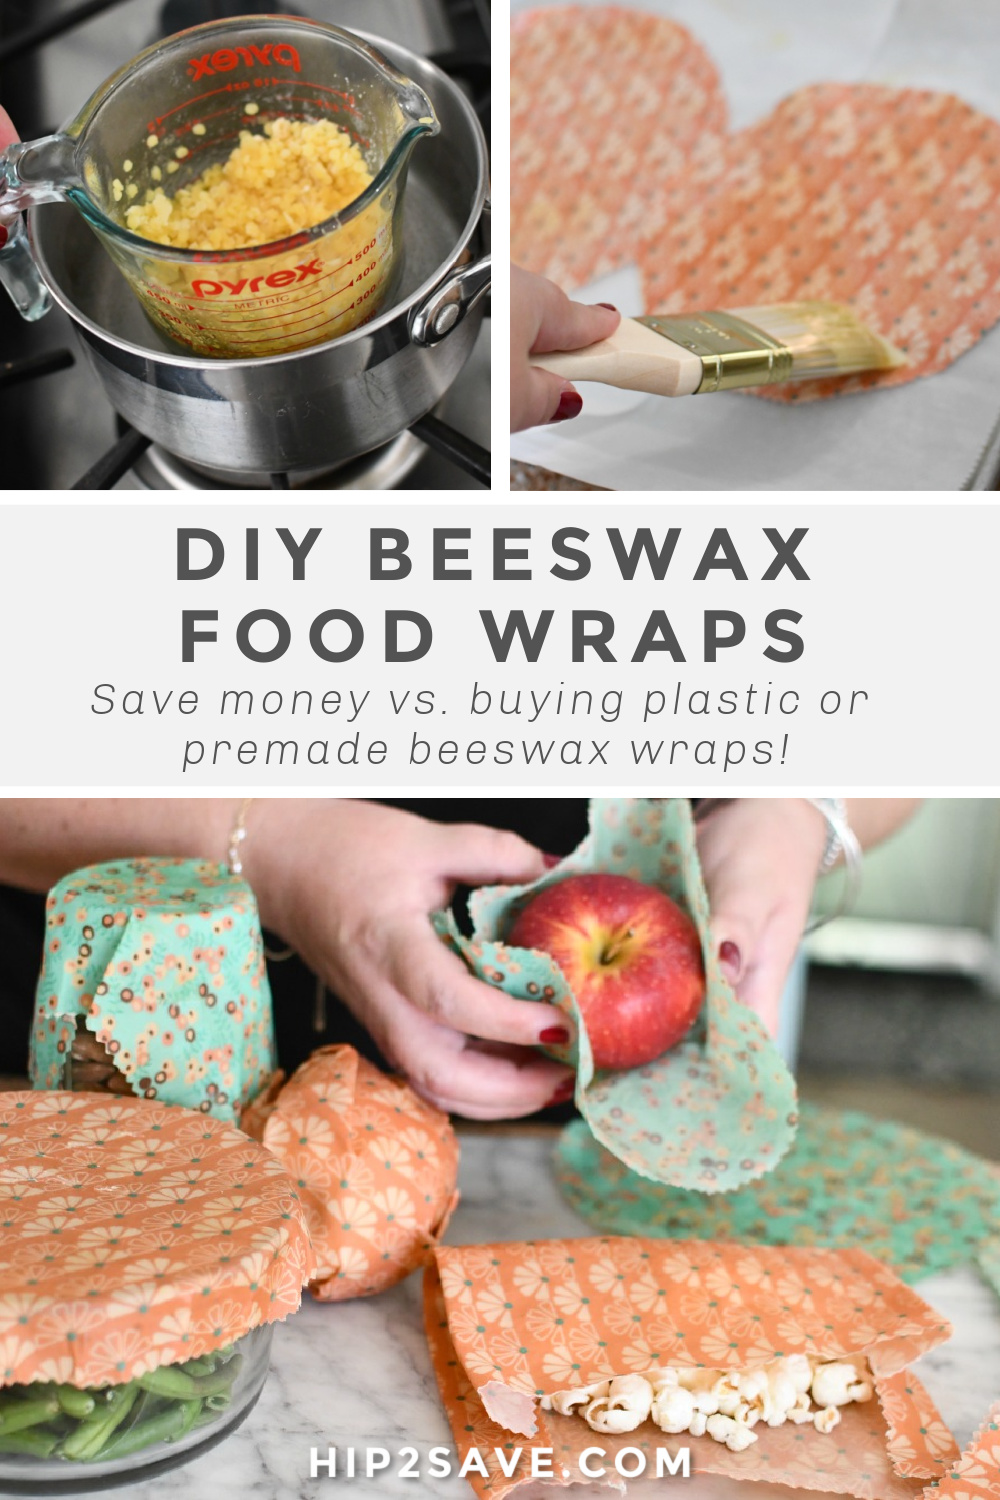
DIY Reusable Beeswax Food Wraps – Say Goodbye to Plastic Wrap!
Here’s an eco-friendly DIY project that’s also fun to make!
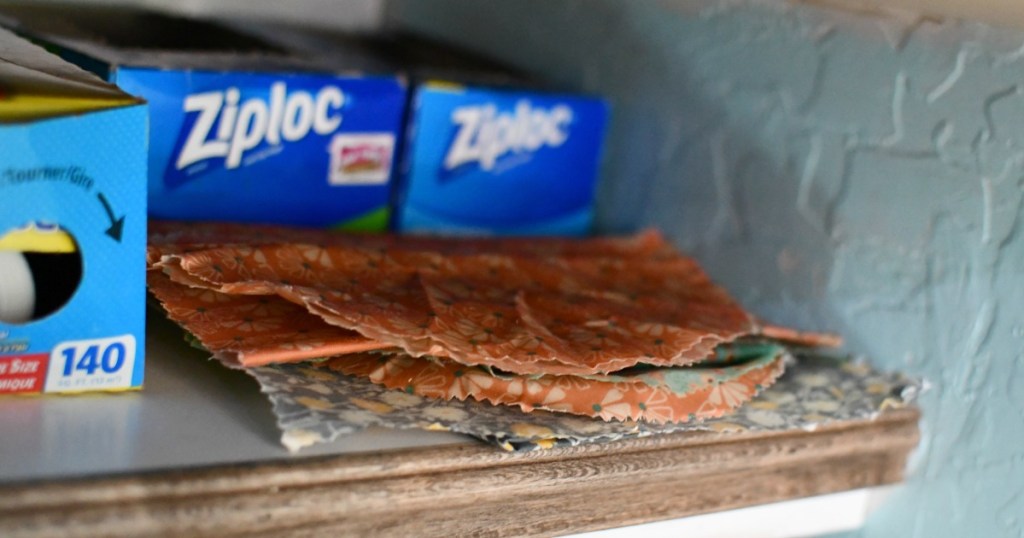
Beeswax food wraps are becoming a popular reusable and natural way to store food as an alternative to single-use plastic wraps. My teammate Sara actually shared recently the re-usable wraps she LOVES from Amazon, and today I’m going to share how you can actually make your own at home using fabric and beeswax pellets.
Hip Tip: If you sew, then you may already have fabric scraps on hand to utilize for this fun project!

I was surprised at how much I loved making these, and think you will, too!
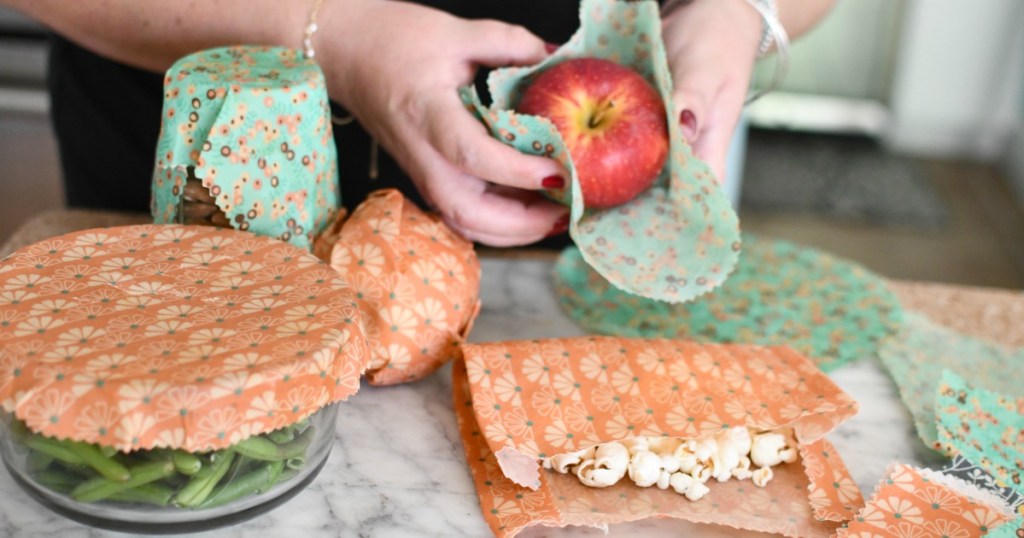
Making homemade beeswax wraps is a fairly easy process, and you’ll be able to use these awesome wax infused fabric pieces to pack lunches, wrap sandwiches, or simply use them to cover bowls and miscellaneous food items in the fridge.
I love that this project is money-saving compared to the store-bought version, eco-friendly, and you can customize the wraps in various shapes and sizes as desired! It’s a win-win all around!
Can I use just beeswax and fabric to make these wraps?
Yes, you can! I tested out this simple method suggested by GoodHousekeeping.com, of melting the beeswax pellets right on the fabric piece in the oven. It did work and is a valid option, especially if you’re wanting to be as frugal as possible!
However, after testing my final product (pictured above), I found that by only using the wax, it didn’t quite create a wrap that was sticky or behaved similar to plastic wrap like the store-bought beeswax wraps everyone loves. For instance, you would most likely still need to use twine, a rubber band, or something similar to keep the wraps closed.
Here’s how to take your homemade beeswax wraps to the next level!
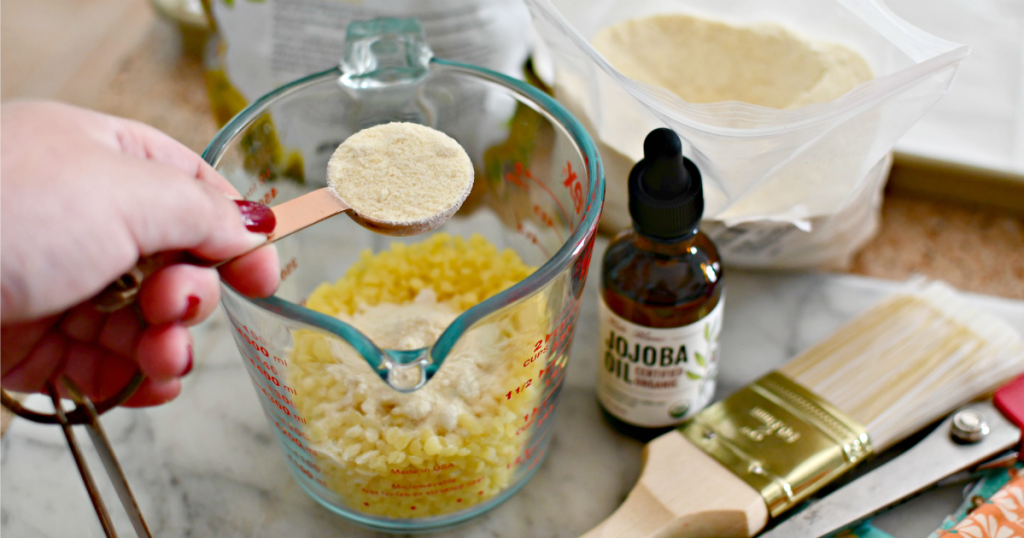
The best way I tested to make these wraps is to melt the beeswax with jojoba oil and pine resin. I know it’s an added investment in ingredients and slightly more work involved to melt on the stove, but I found the result to be worth it and it’s super satisfying to know they actually work well!

The jojoba oil will prevent the wax itself from cracking while also not leaving a greasy residue like coconut oil is said to do. And the pine resin will give homemade beeswax wraps a stickiness to create a nice seal like the store-bought versions have.
Tips for making the best DIY reusable beeswax food wraps:
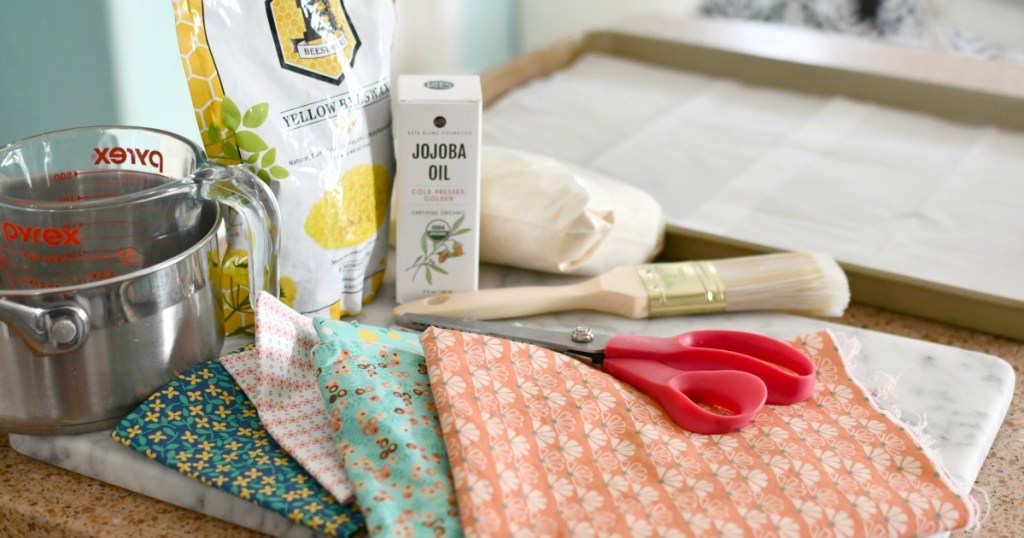
- I used beeswax pellets to save the step of grating a large block, but you can certainly do that instead if desired. The beeswax I chose is yellow and did slightly give my fabric a yellow-ish hue, which I did not mind. Consider using a pure white beeswax if you prefer not to have a yellow-tint.
- To make these wraps vegan, you could try substituting beeswax for carnauba wax flakes. It seems to be a popular substitute, although note that I did not personally try it.
- Make sure to wash and dry your fabric first before doing this project. A lightweight 100% cotton fabric is recommended.
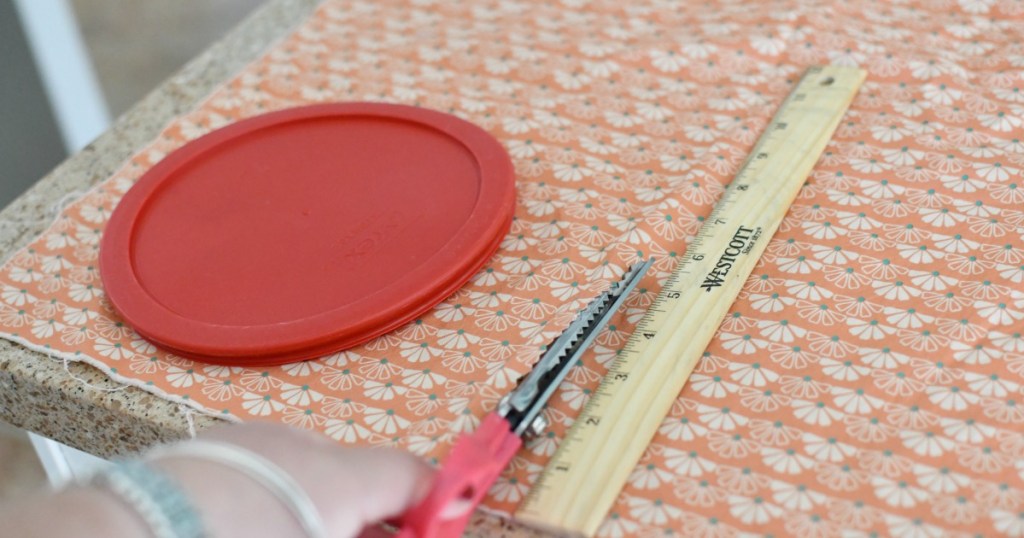
- I used sewing pinking shears to cut my fabric material so that the edges won’t fray. If you have some, I’d suggest using, or sharp scissors will do in a pinch.
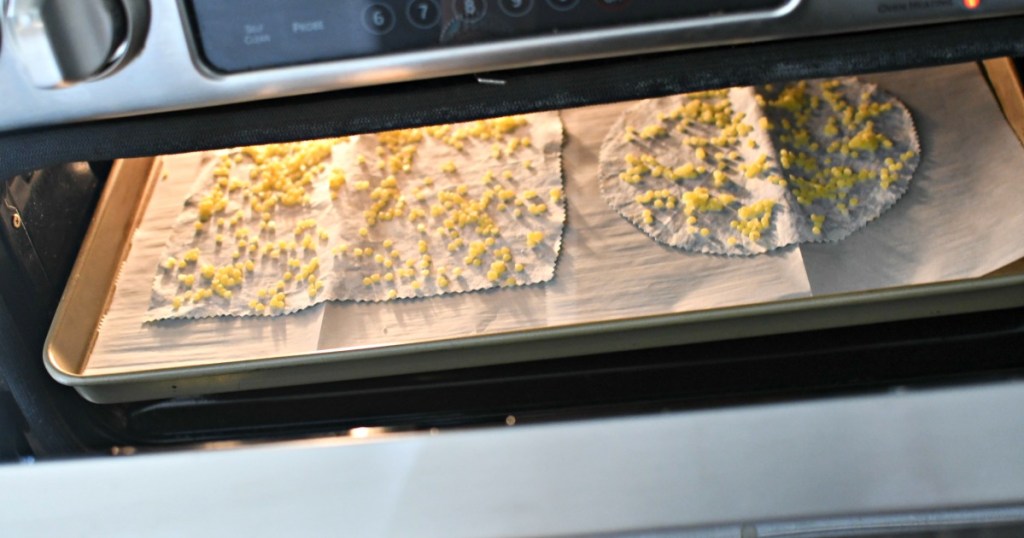
- This is a slightly messy project, so protect your surfaces. Make sure to cover your baking pans with parchment paper before baking the beeswax wraps.
- I’d use a paintbrush from Dollar Tree because you’ll probably need to toss it afterward. I wouldn’t want you to ruin an expensive brush with this DIY.

DIY Reusable Beeswax Food Wraps
PrintSupplies Needed
Directions
1
Wash and dry your fabric. I also ironed mine but I’m sure that’s optional.
2
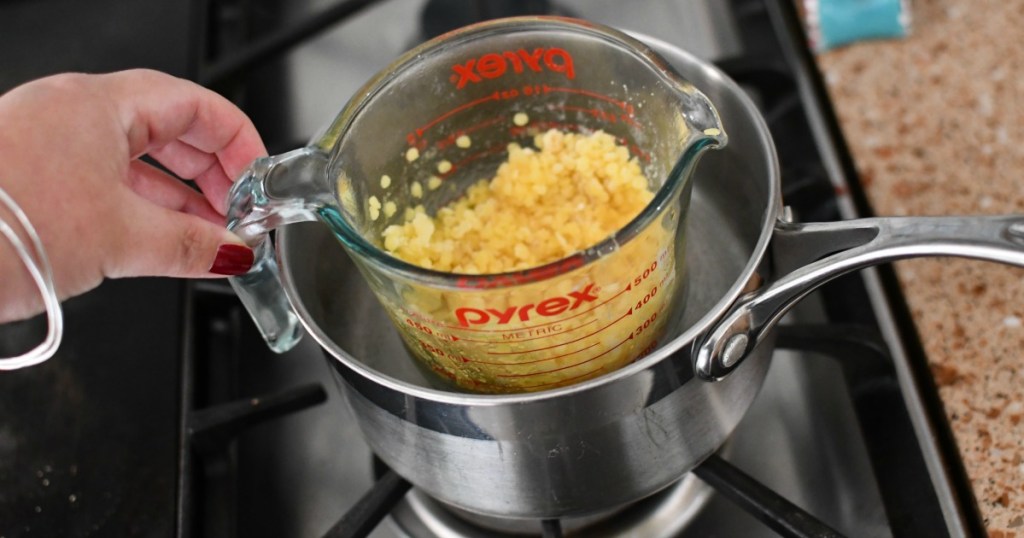
To a glass dish or glass measuring cup, add the beeswax, pine resin, and jojoba oil. Mix with a spoon or popsicle stick.
3
Heat a small pot with water to medium/low heat. Make a DIY double boiler by placing the glass bowl or measuring cup inside a small pot. Make sure the water line is lower than the top of the cup.
4
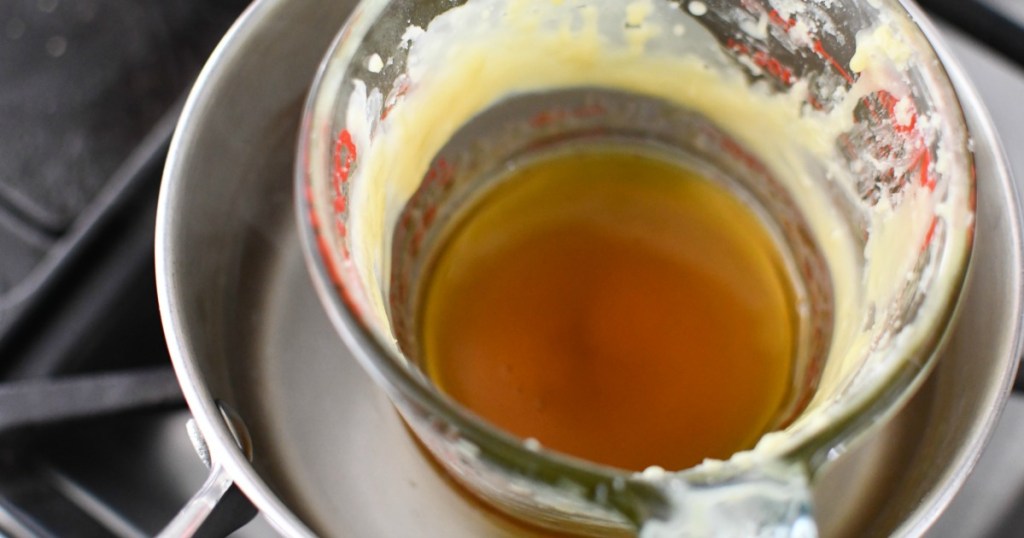
Melt the beeswax mixture on the stove until smooth. This could take up to 30 minutes to get it completely melted and clear-ish looking. Check it periodically and stir.
5
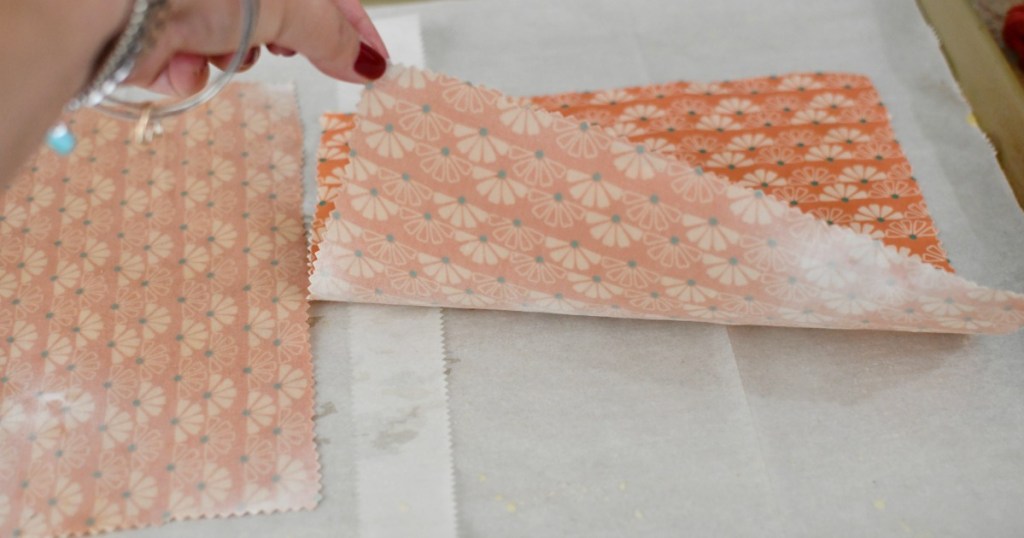
Cut material into desired shapes using shears. 10-inch squares and circles are what I made.
6
Preheat oven to 300 degrees. Line a couple of baking sheets with parchment paper, and place the fabric on top. It won’t matter which side.
7
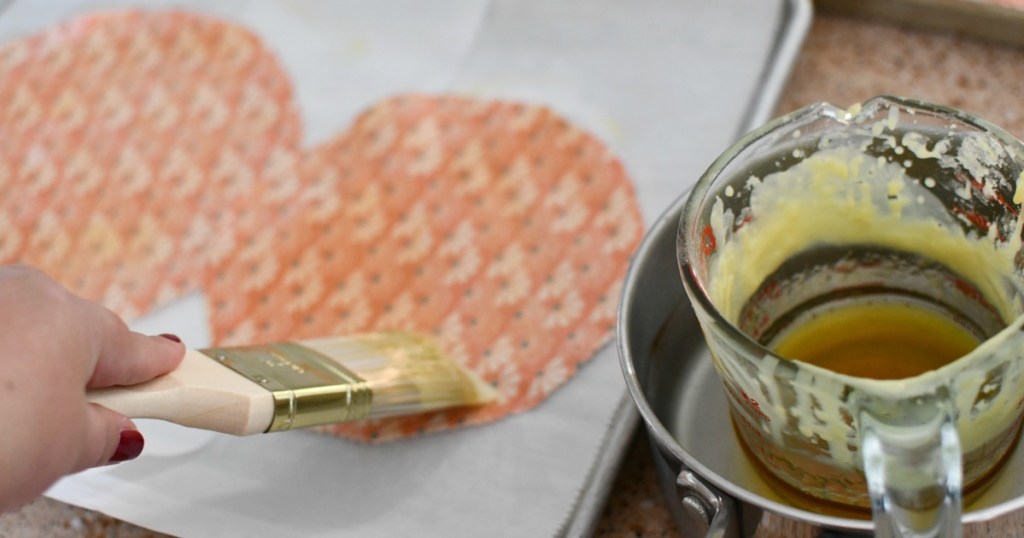
Use a paintbrush to brush on the melted wax mixture to each piece of fabric. Place in the oven for 4 minutes.
8
Take the wraps out of the oven and flip them over. If you see any spots that don’t have any wax, reapply to those areas using the paintbrush. By the way, I found it easier to just keep the wax melted on the stove on low.
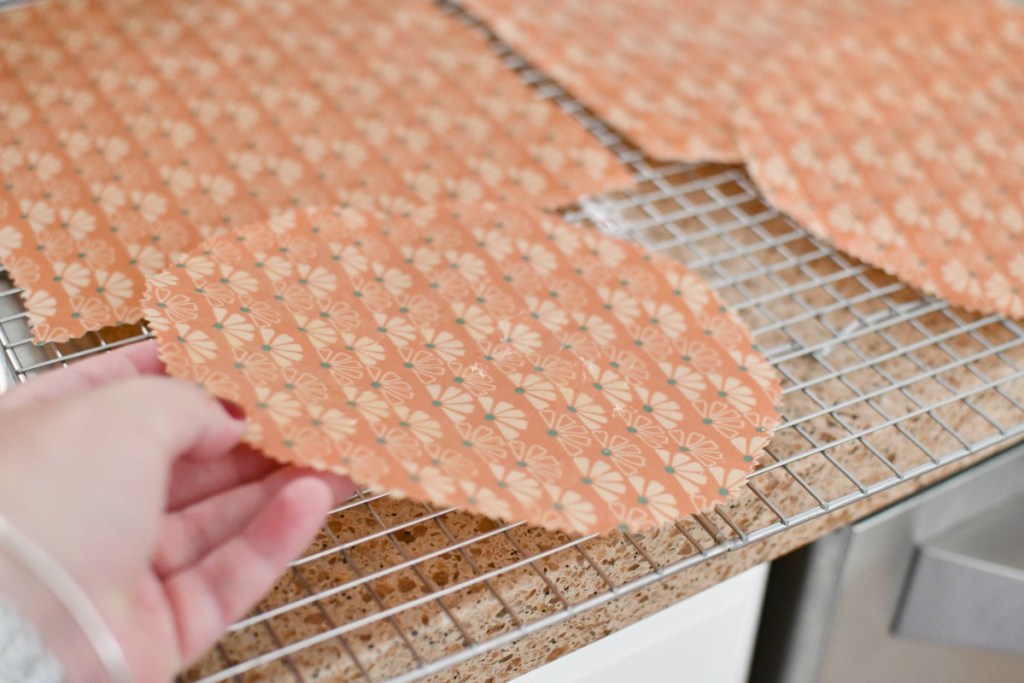
9
Put the wraps back into the oven for another 4 minutes. Remove them from the oven, and either hang them dry over a string and binder clips or let them dry on a cookie rack like I did. A clothing hanger and clothing pins would work also.
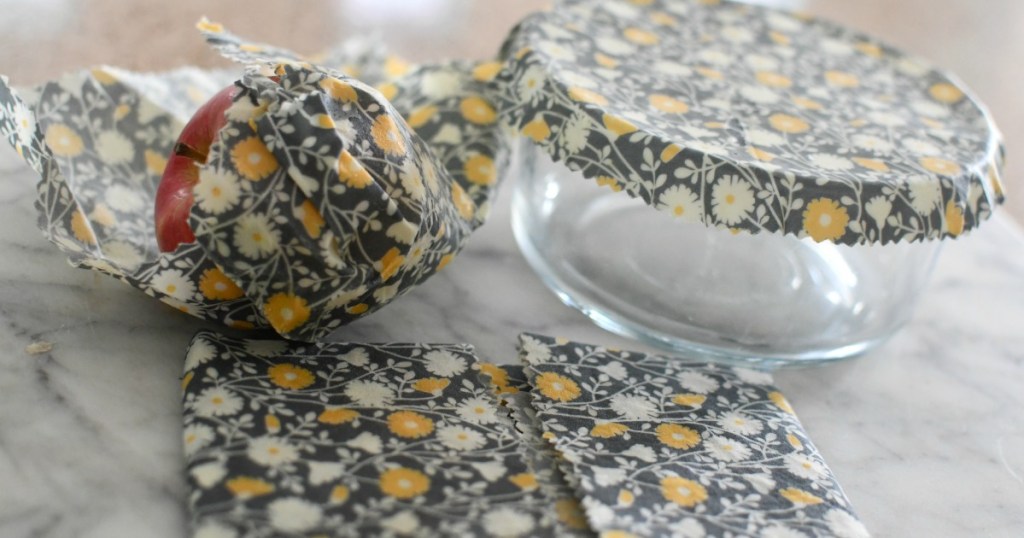
10
Once dry, use your beeswax wraps for food storage by either covering a bowl, a jar, or wrapping a piece of fruit, sandwich, etc. Enjoy!

So is this actually less expensive than buying via Amazon?
Yep! I was able to make 10 small/medium-sized 8″-10″ wraps and only used a very small portion of the supplies that I bought. The wraps via Amazon.com are 3 for $18 for similar sizes. I estimate that I’ll be able to make at least 25-30 wraps using the $45 in materials I purchased, which makes each wrap under $2!
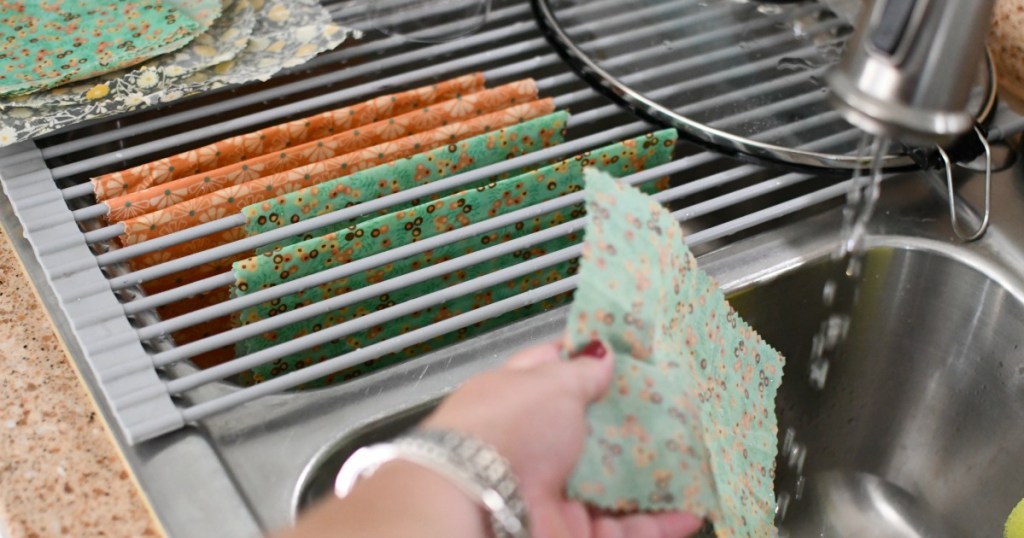
How do you care and store homemade beeswax wraps?
To wash, you’ll want to rinse your beeswax wraps in cool or warm water and gentle soap if needed and then hang dry. I use my handy roll-up kitchen drying rack to dry mine.
You can then just easily fold them up to store homemade beeswax wraps for later use. I am currently storing them with my other food wraps and baggies. I am hoping to use them more often than the plastic wraps, of course.
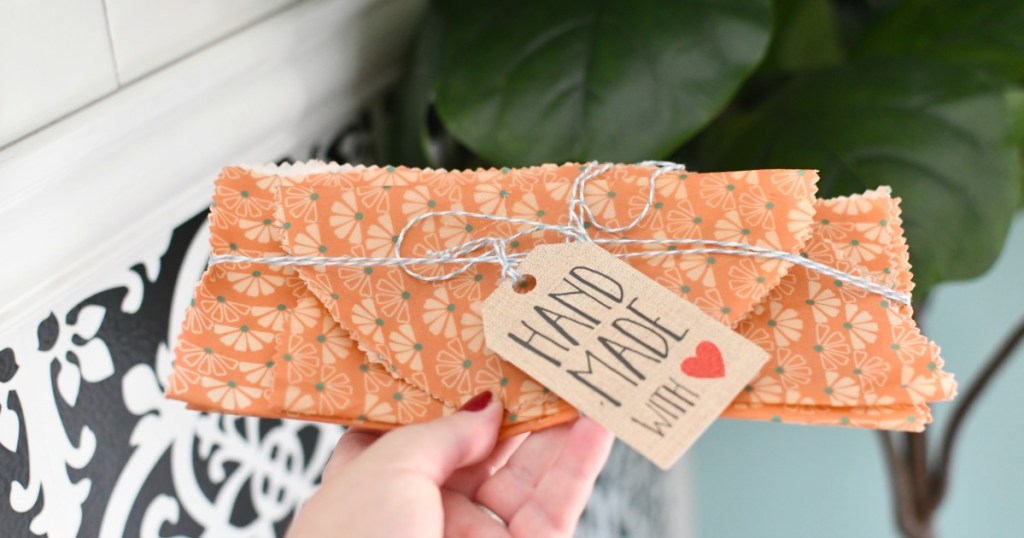
Consider making these wraps as a gift!
Simply wrap a few in some ribbon to gift to friends and family. You can also buy these adorable gift tags on Amazon. I think they would make such a thoughtful handmade gift!


I love seeing eco-friendly posts on Hip2Save! These beeswax wraps are a great alternative to plastic wrap. For several years, I’ve been using small glass plates from the dollar store (or thrift store) instead of plastic wrap or foil, to cover food items. They work great.
Thanks for the feedback and tip Paisley!
Impressed!
Thanks! I’m glad you like this idea!
Lina! Love your videos. Can you tell me about your “I have nothing to wear” shirt? So cute and I like the font and design on yours.
Oh Thanks so much!! It’s a graphic t-shirt from Cents of Style we featured last year. Doesn’t look available anymore though.
This is great information – I love the idea of giving them as gifts – Christmas here I come!!
Thanks so much Jill!
I have wanted these, but felt they were really expensive. I can totally justify buying the supplies under the guise of a fun craft activity, a gift, and something I have been thinking about buying for myself anyway. I can’t wait to try DIYing them!
Yay thanks Emily! These are so fun to make- enjoy!
I too love seeing eco friendly products and topics on Hip2Save. Thanks for this. I can’t wait to try it.
Thanks Natie!
I too love seeing eco friendly products and topics on Hip2Save. Thanks for this. I can’t wait to try it.
Won’t the wax melt on your food in the microwave?
Ya I don’t think I’d use in microwave. Just for storage.
I have multiple different sizes of the beeswax wraps and they are awesome. I use them at least once a day for my kids lunches and when we have left overs. Use the larger size for larger dishes instead of foil. They also are great for lunches instead of plastic baggies. Easy to clean as well!
That’s so wonderful! Thanks for sharing 👏
I got a 4 pack for under $10 on amazon, for those like me who aren’t crafty! Bees Wax Food Wraps, set of 4,BEE Zero Waste,Random Colours,Handmade in England, Natural alternative to cling film, plastic free eco lids, reusable food wrap https://www.amazon.com/dp/B089454L9H/ref=cm_sw_r_cp_api_i_xpuwFbGFKWM7M
I was just getting ready to go get the stuff to make these and then found your post. I researched the company and they’re very and environmentally conscience. I was so glad to see they were made in England, too. Thanks for the link.
Lina, were you able to clean the glass measuring cup and any other dishes or utensils that you used for this project so that they could be used for food prep again, or would they need to be dedicated to craft projects after this? I’ve had beeswax food wrap on my list of potential projects for 3 years, but haven’t done it, partly because there are so many different methods and recipes out there. It’s nice to have a tested method from someone I trust. Thank you!
I poured the remaining wax into a silicone mold so I could use it again. I ended up freezing the glass Pyrex and then removed some the stuck on wax. I used a popsicle stick to stir it so threw that away. Hope that helps! 💕
I have seen some on Etsy. Haven’t bought yet but I think I’d to.
I would use 100% organic cotton fabric
A Star Hip2Saver is a recognized member of our Hip2Save community hand selected by our team for demonstrating a long history of engagement with helpful & friendly comments across Hip2Save.com and our social channels. Our Star Hip2Saver badge acts as a verification for readers who know the ins and outs of all Hip2Save sets out to accomplish — assisting our community to live extraordinary lives on ordinary budgets. Readers cannot pay or provide any sort of exchange in order to earn this badge. Rather, they are invited to participate by a member of the Hip2Save team and opt to have the Star Hip2Saver badge added to their profile & comments.
This might be a completely different pine resin than my grandparents used to use, don’t know. If it is the same than pine resin catches fire quickly and burns rapidly. Old-timers used cotton and pine resin to create torches. The other thing to know about how it burns is that it becomes like a gel that you can’t get off and makes horrific burns. Watch the oven temp, don’t drip on the oven or pan, and don’t store anywhere near a flame or the stove. I’m sure this makes a great product just be careful.
Does anyone know of any local stores that would sell the beeswax pellets vs. waiting for them to ship from Amazon? TIA!
A Star Hip2Saver is a recognized member of our Hip2Save community hand selected by our team for demonstrating a long history of engagement with helpful & friendly comments across Hip2Save.com and our social channels. Our Star Hip2Saver badge acts as a verification for readers who know the ins and outs of all Hip2Save sets out to accomplish — assisting our community to live extraordinary lives on ordinary budgets. Readers cannot pay or provide any sort of exchange in order to earn this badge. Rather, they are invited to participate by a member of the Hip2Save team and opt to have the Star Hip2Saver badge added to their profile & comments.
Try Michaels
Love the idea of this.
Yes! Thanks Feuy!
Great idea but think I will just purchase mine 😉