
DIY Sliced Wood Christmas Ornaments

If you like making homemade Christmas ornaments, try this easy and frugal craft using sliced pieces of wood and paint. This project offers a unique way to up-cycle any wood you may have on hand and also makes a thoughtful gift idea. Note that I used mesquite wood that I had at home and cut the pieces with a table saw. If you do not have access to a saw, you can purchase sliced birch pieces online or at your local craft store.
 DIY Sliced Wood Christmas Ornaments:
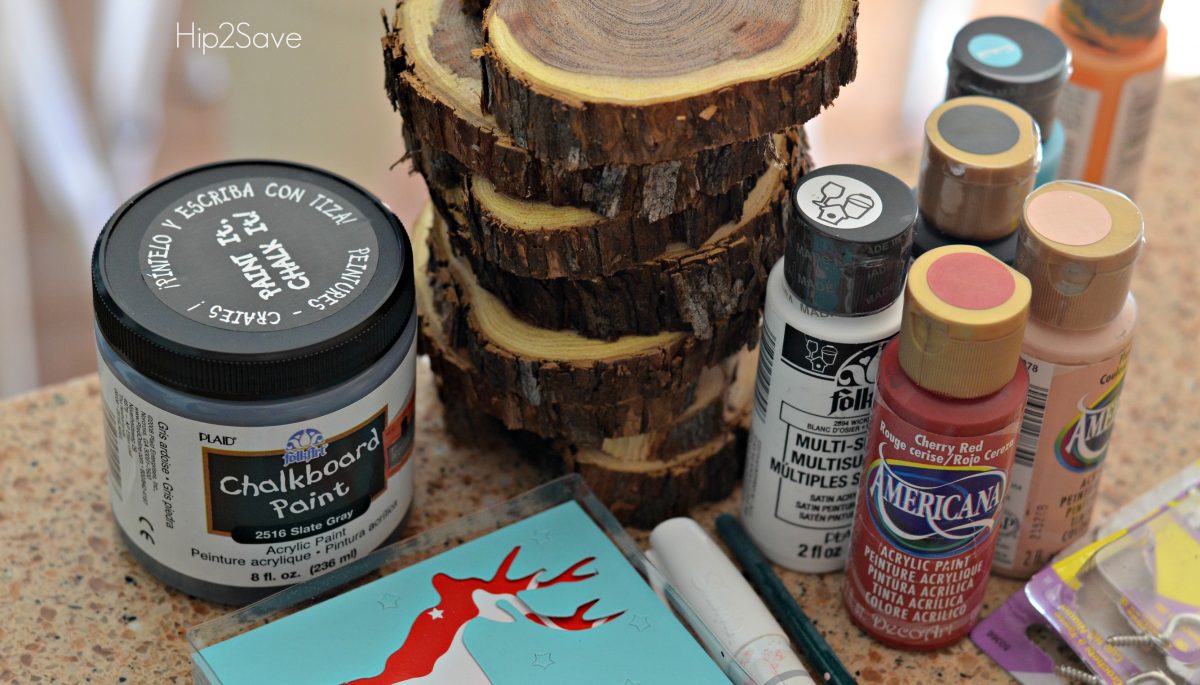
Supplies Needed:
- 3/4 inch thick sliced wood about 3-4 inches in diameter
- small screw in eye hooks (from the hardware store)
- holiday-colored ribbon or twine
- craft acrylic paint of various colors
- small craft paintbrush
- small holiday-themed or monogram stencils if desired (I used the Martha Stewart brand)
Directions:
- Paint and embellish wood slices as desired and let dry.
- Screw-in eye hooks to the top of each ornament and embellish with a ribbon or twine.
- You could also drill a hole towards the top of each circle and tie the twine to hang instead of using eye hooks.
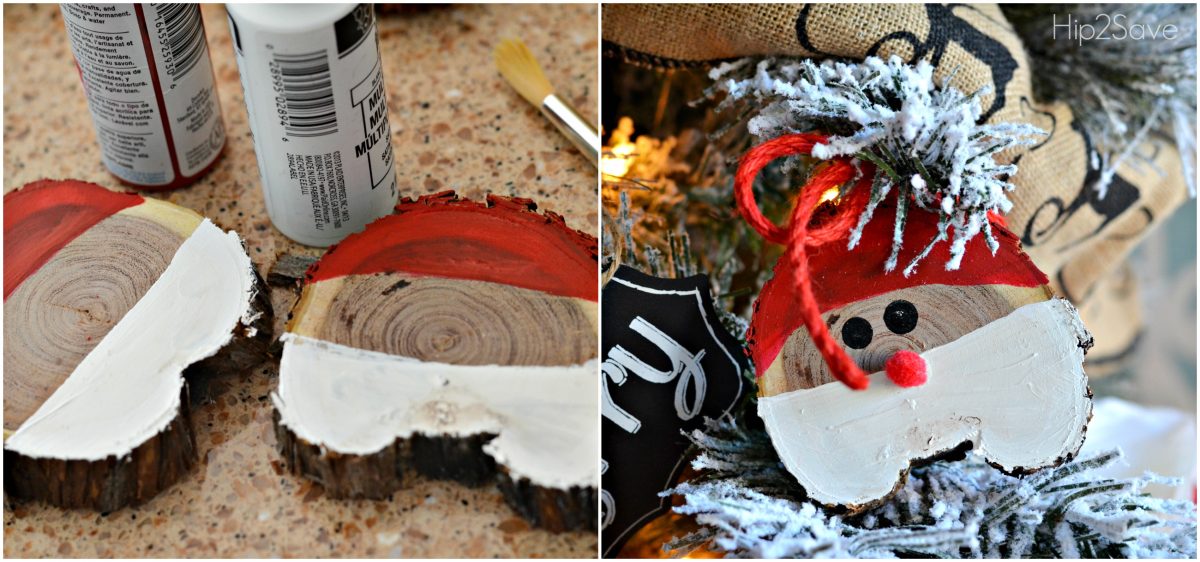
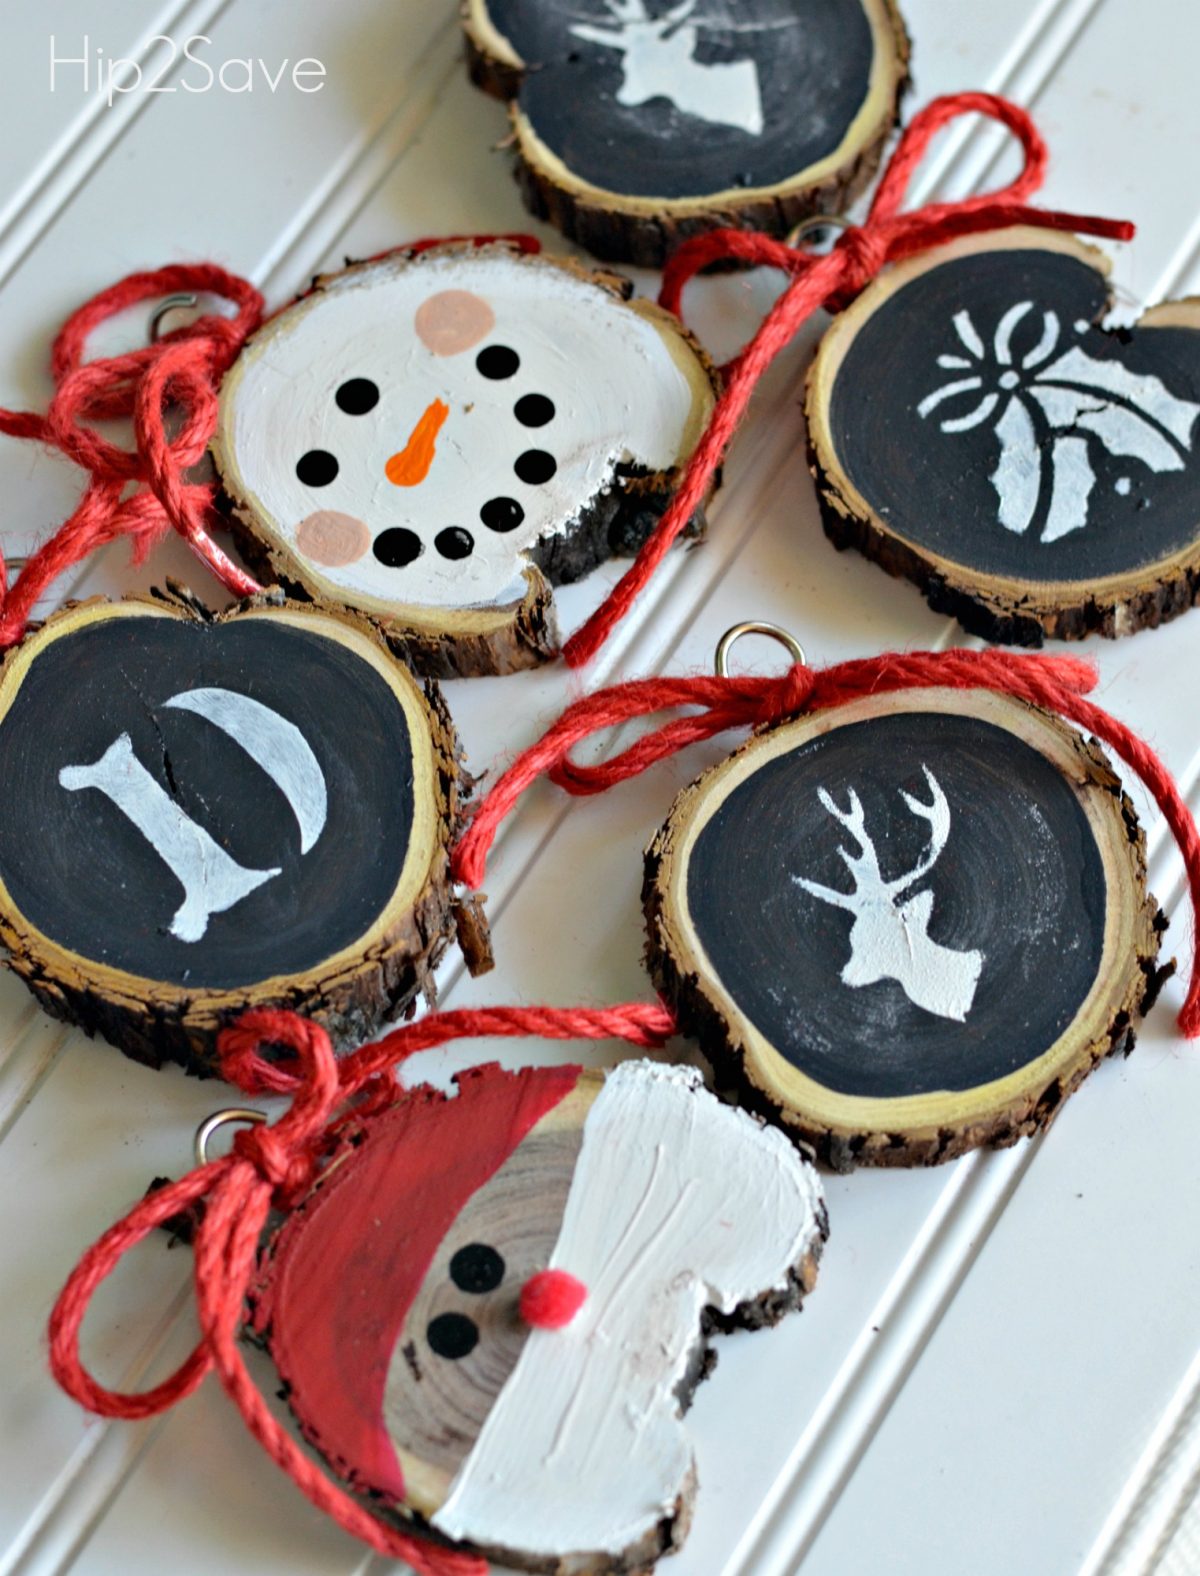
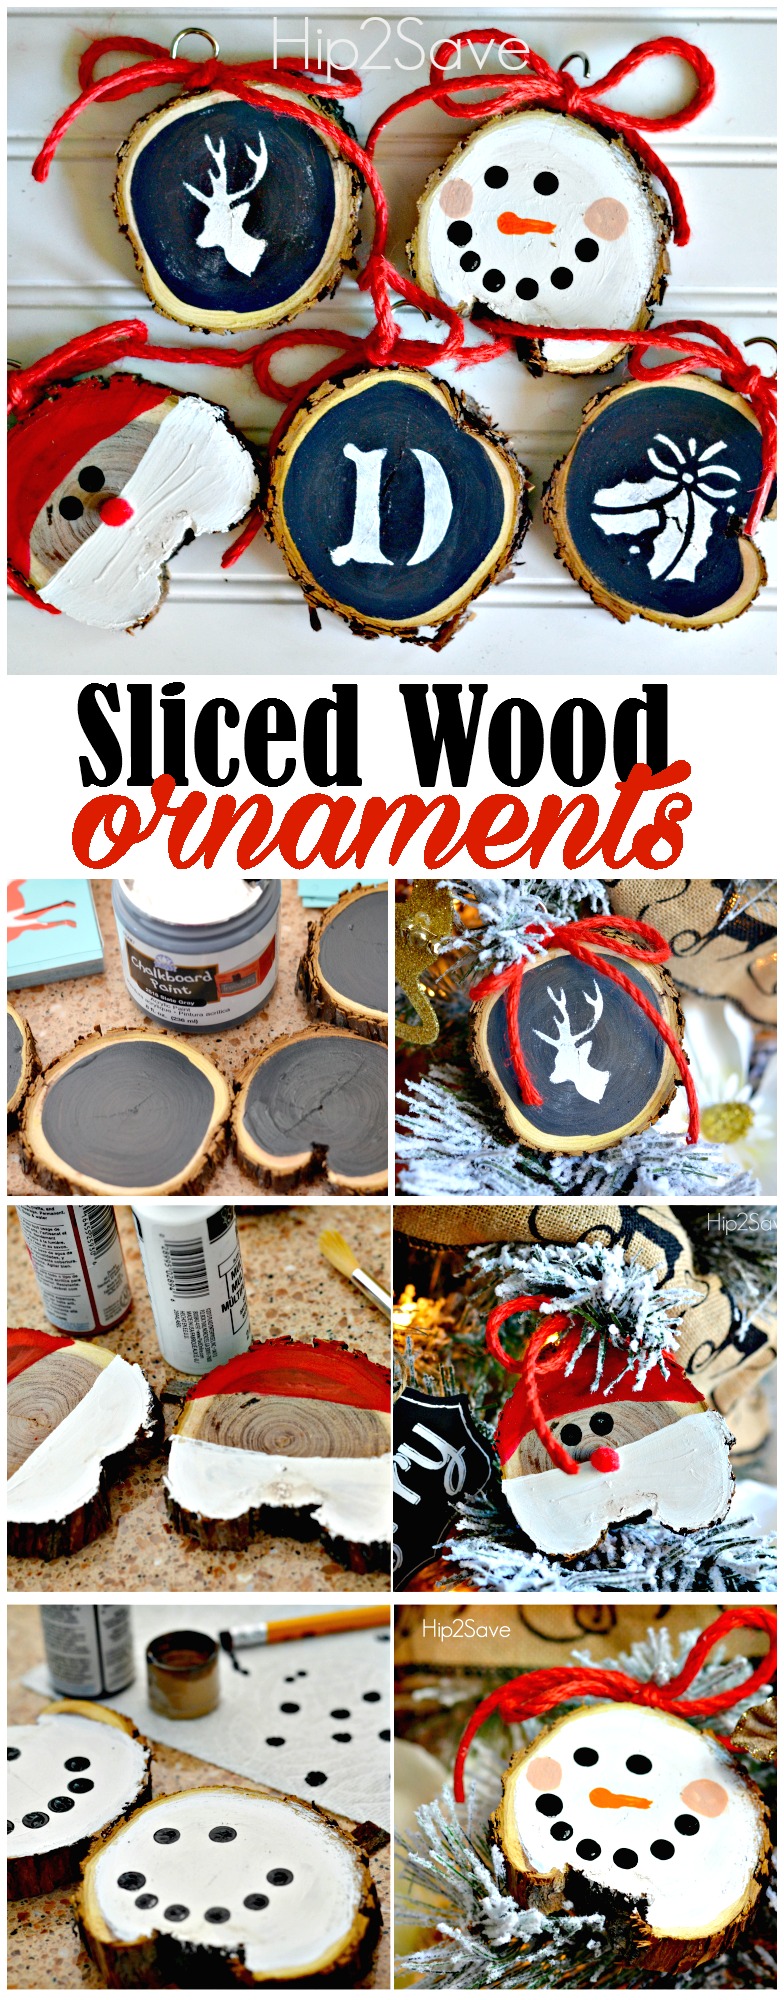
To make the Santa ornaments pictured above, first, paint the top 1/3 of the wood slice in red and the bottom 1/3 in white. It’s best to use two coats of paint and let dry in between coats. Add a small red craft pom using glue for Santa’s nose or a red dot of paint.
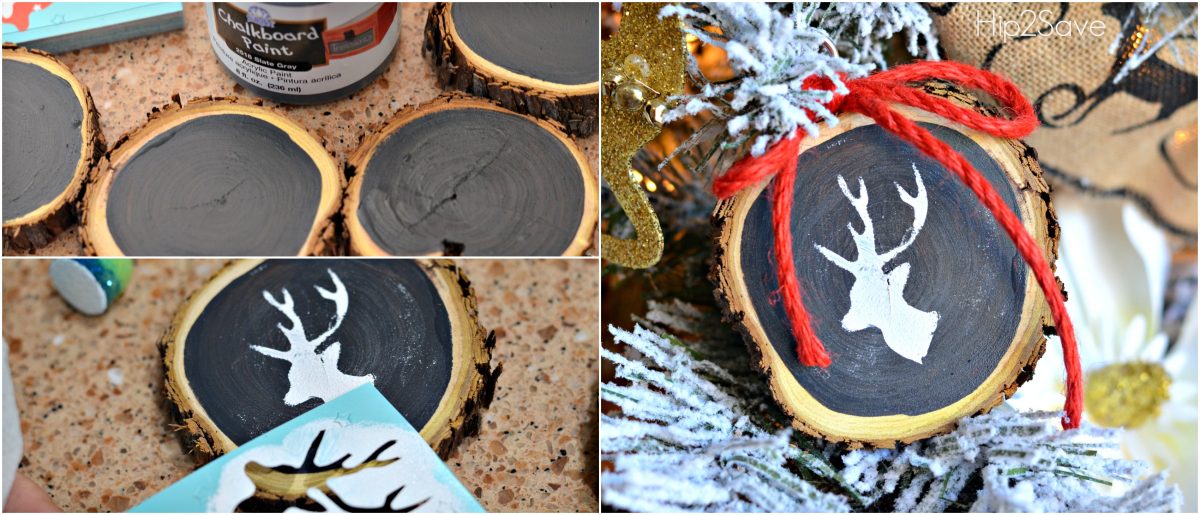
To make these chalkboard inspired ornaments above, first, paint two coats of black paint or chalkboard paint on one side of the wood and let dry. Then use white paint and stencil a holiday-related image or monogram letter.
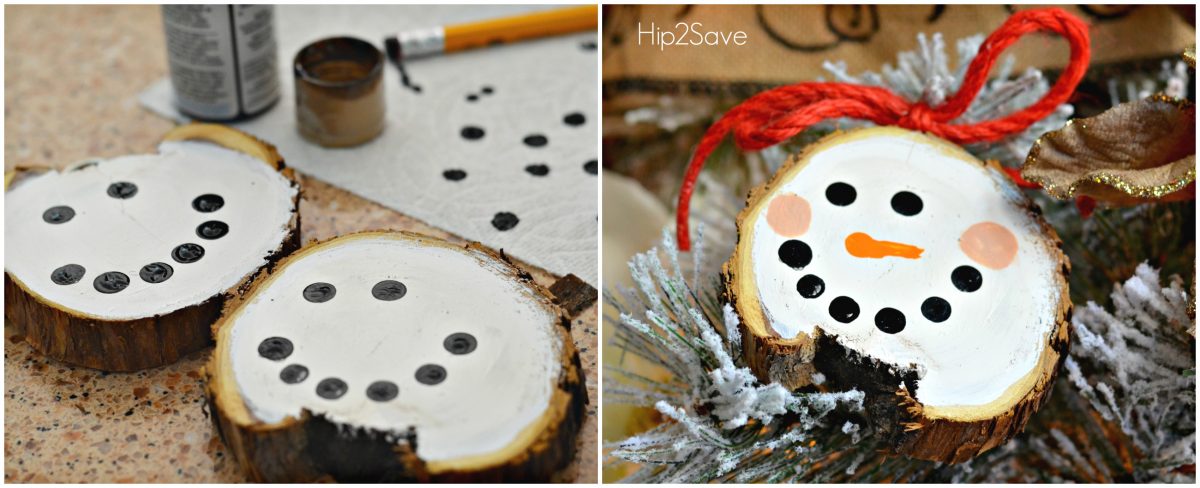
To create this snowman pictured above, first, paint the entire side of ornament white and let dry. Then use a pencil eraser tip to stamp on circles with black paint for eyes and mouth. Use orange paint for the nose and pink or flesh-colored paint for cheeks.


If you cut your own tree at a tree farm, you can have the folks there cut a “cookie” or two off the bottom when they’re leveling it off. Fun to have a ornaments made from all your past Christmas trees 🙂
Now that’s a neat idea!
Great idea Tera! Love it.
That is what we did with our sons First Christmas christamas tree. It’s one of my favorite ornaments!
Too cute! I’m planning to make the Santas you wrote about tonight! So excited! 🙂
Awesome! Thanks for reading Catie. 🙂
Wow I love the black stenciled ones I just redone my tree this year in a “woodland” theme and those will look awesome!!
Fun!!
I am unable to pin on Pinterest. Was hoping to save it. 😊
We are working to get our Pinit button fixed. Thanks for letting us know.
In the meantime please use this URL and go to Pinterest app or site and add a pin from web (push the plus sign)
https://hip2save.com/2015/12/03/diy-sliced-wood-christmas-ornaments/
It will let you pick which image to pin.
Thanks!
So neat, thanks Lina!
Sure! Enjoy 🙂
Every year when Christmas is over we cut a piece from the bottom of our tree and then I drill a hole through it and then paint the year on it and turn it into an ornament. That way we have a piece from every christmas tree we have ever gotten.
Love that idea!
We grab a bunch of these every year when we go to get our tree. They have bunches of them laying there from when the trim the bottom😊
They’re all so cute! Especially the Santa!
Thanks Vivian!
The monograms are so cute!
These are totes adorbs Martha
Lol thanks Tara!
Made 25 but with a name for Jesus on one side and the scripture reference on the other (Lamb of God, Emmanuel, Messiah, etc). Our family picks one, finds and reads the scripture and then hang it up on a special tree every night 🙂 (I purchased most of mine from Michaels with a 50% coupon and there were 20 little wood birch circles. The other 5 we got from out cut Christmas tree)
Such a great thought and family gathering…keep “Christ” in “Christmas”.
I bet that is beautiful and special. Great idea!
Did you have any issues with the ones from Michaels cracking after you painted them? Ive have 2 crack so far that I had gotten from Amazon. 🙁 Thanks!!
Love that!💕
Totally love these!!!!!!💕
Those Santa and snowman faces are too cute! I’m totally making some of these as soon as my wood slices come in the mail! I can’t wait.
Kate | TheOrganizedDream.com
How fun! Enjoy 👍😀
I planted a tree for a child that I miscarried. The tree started having some problems (dying) and my Ex-Husband had to cut it down. I kept a large section that I plan on doing something with. The Christmas ornaments sound like a great idea that I can do for both my Ex and myself. Plus I still have a lot of the log left over to do other projects with it I so desire. Thanks
I’m so sorry for your loss Connie. What a nice way to use the tree. Have a beautiful holiday
My hubby and I are really interested in this project. Doug would like to know how you keep the tree “slices” from checking/cracking while drying.
What if your painting your piece of wood and then it cracks. I coated them twice and then that happened. Does anybody know why???
Do you have to dry out the wood for a certain amount of time?