
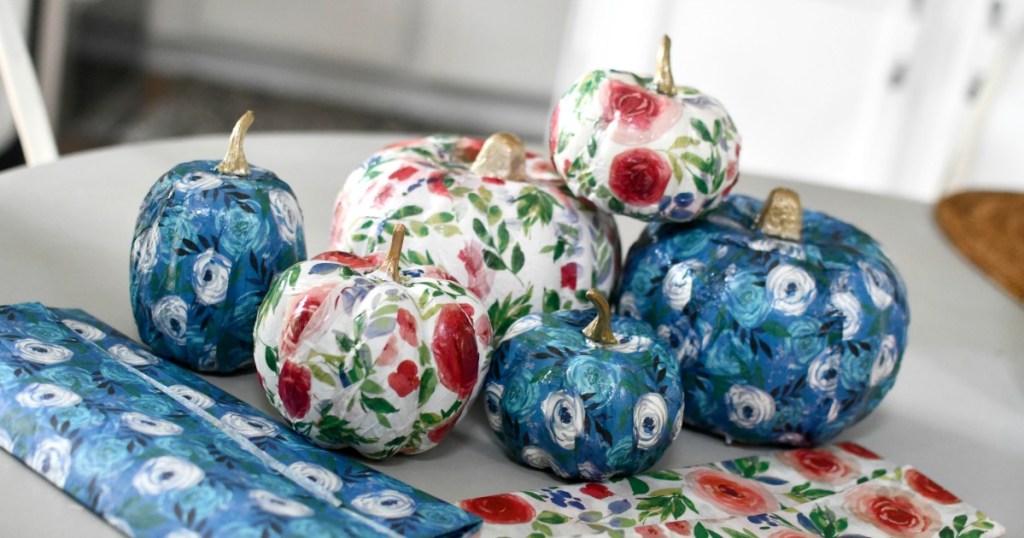
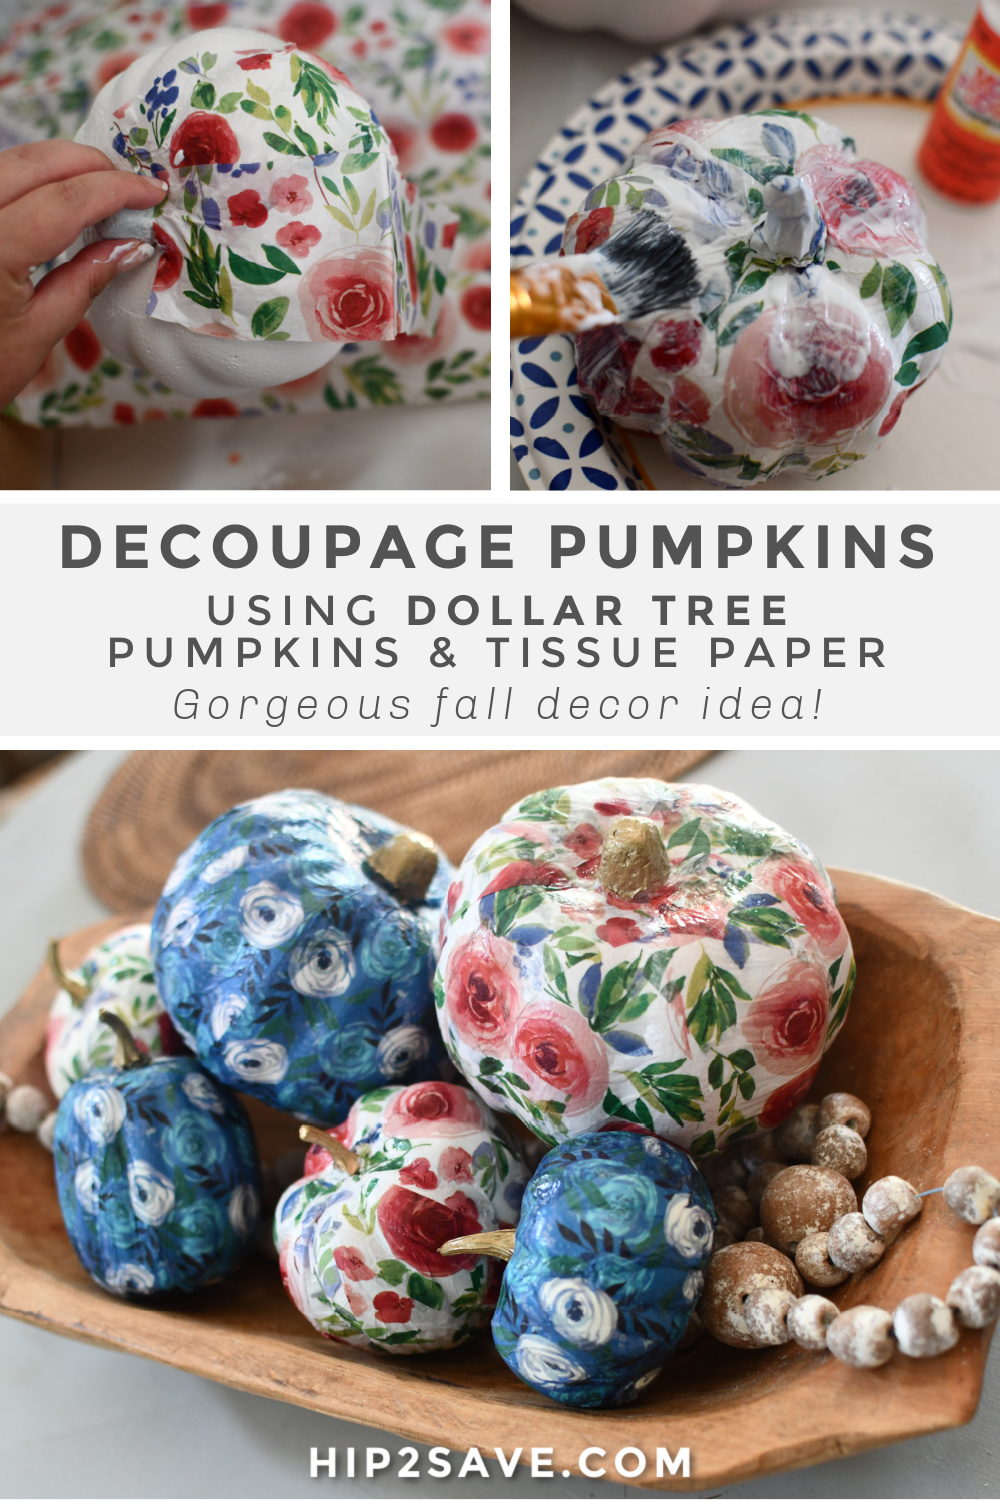
Transform Dollar Tree Pumpkins Using Tissue Paper!
Decoupage pumpkins are easy to DIY with Dollar Tree supplies!
In the mood for a fun fall craft?
I’m not sure about you, but nothing cheers me up quite like an easy Dollar Tree DIY project. Today I’m sharing this cute and easy idea of decorating craft pumpkins using pretty tissue paper (decorative napkins would work, too!) and Mod Podge decoupage! For me, a simple craft can be such great therapy and this one is such a blast to do.
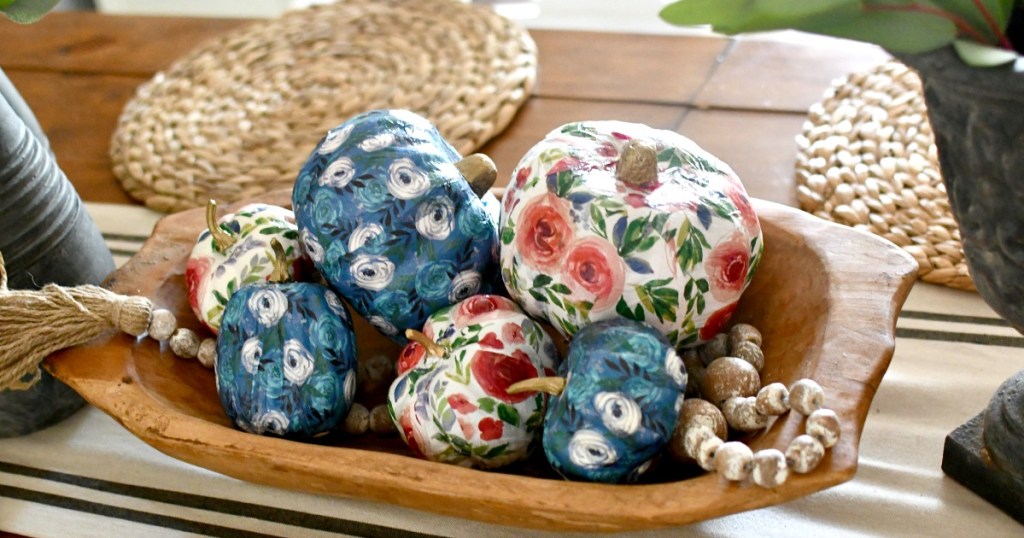
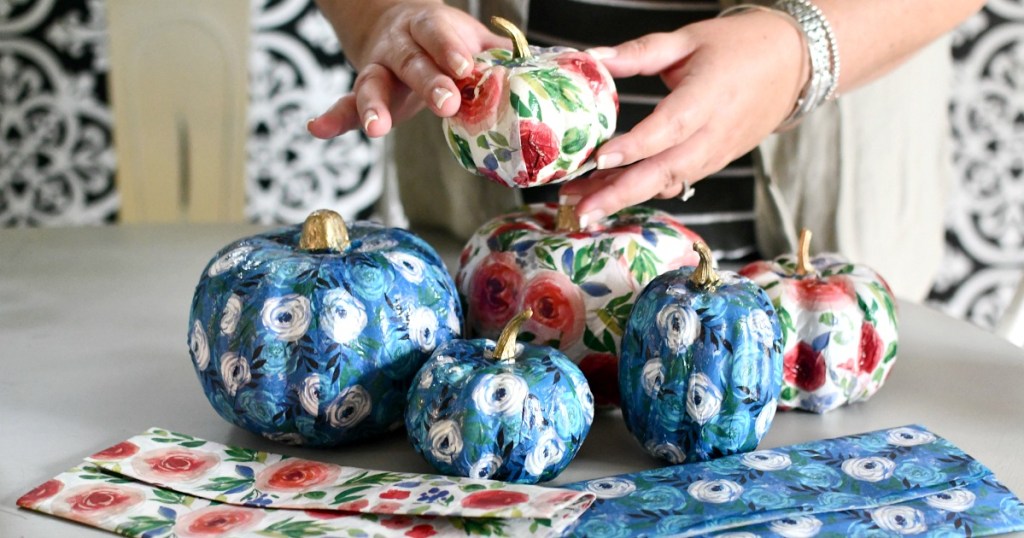
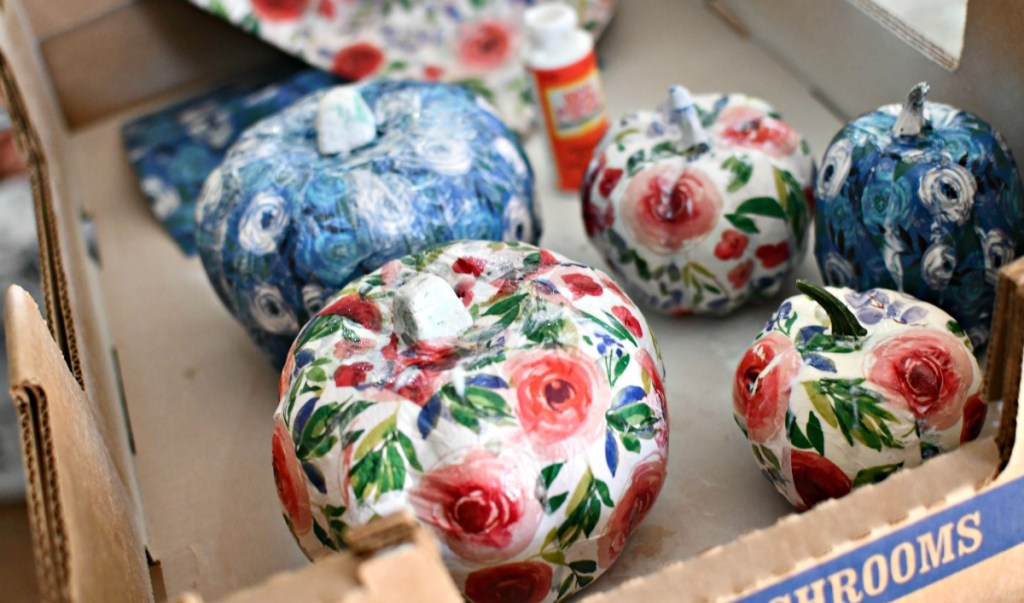
The result is a beautifully whimsical craft pumpkin makeover that looks much more expensive than $1! Create a grouping of these and place them in a bowl to incorporate as part of your home’s fall decor!
Dollar Tree has all the supplies you’ll need!
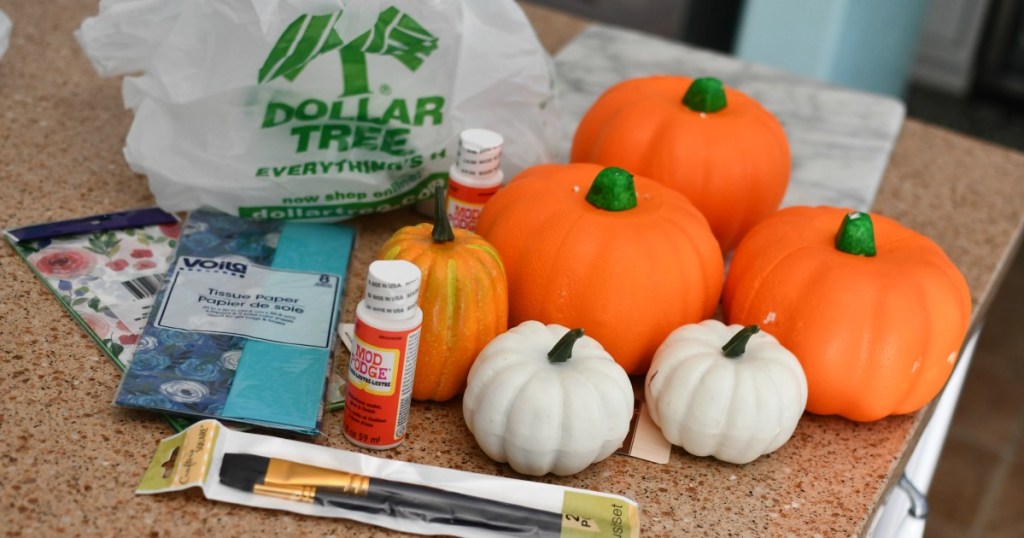
If making decoupage pumpkins is on your fall bucket list, then you’re in luck because, not only is this a pretty project, but it’s frugal, too, because most of the supplies you can pick up at Dollar Tree. I spotted this floral tissue paper in-store, and it was the inspiration for this project. They also have various-sized craft pumpkins to decorate, too. All for just $1 each! 🙌
If you happen to have any pretty tissue paper, or decorative napkins, in your stash at home and craft pumpkins from previous years, this would also be a great opportunity to use those instead of buying new ones.
Hip Tip: If you’re looking to do a craft that would work all year long, try following the exact same steps but with a terra-cotta pot instead of a pumpkin; it works just as great!
Tips for making these adorable Mod Podge decoupage pumpkins:
- You can use tissue paper or even decorative paper party napkins! If using napkins, removed the 2nd layer so you’d just be applying the top layer (so a single ply) with the design using Mod Podge.
- I decided to paint my pumpkins white first to hide the bright orange color using a light coat of white spray paint. That’s an optional step, and you can use whatever paint you have on hand. Spray paint can melt the styrofoam, so just spray lightly and sparingly, and not super close to the pumpkin. You can also treat it with a craft foam primer, or use a brush and craft paint instead. If your pumpkin is plastic (I used both styrofoam and plastic), the spray paint will work with no issues.
- I painted my stems gold, and that is optional, too. You can use gold craft paint, or I sprayed a paintbrush with this gold spray paint and then quickly painted some on each stem.


Decoupage Dollar Tree Pumpkins Using Tissue Paper
PrintSupplies Needed
- craft pumpkins
- spray paint (optional if painting first)
- Mod Podge decoupage
- paint brush or paint sponge
- tissue paper
- gold paint
Directions
1
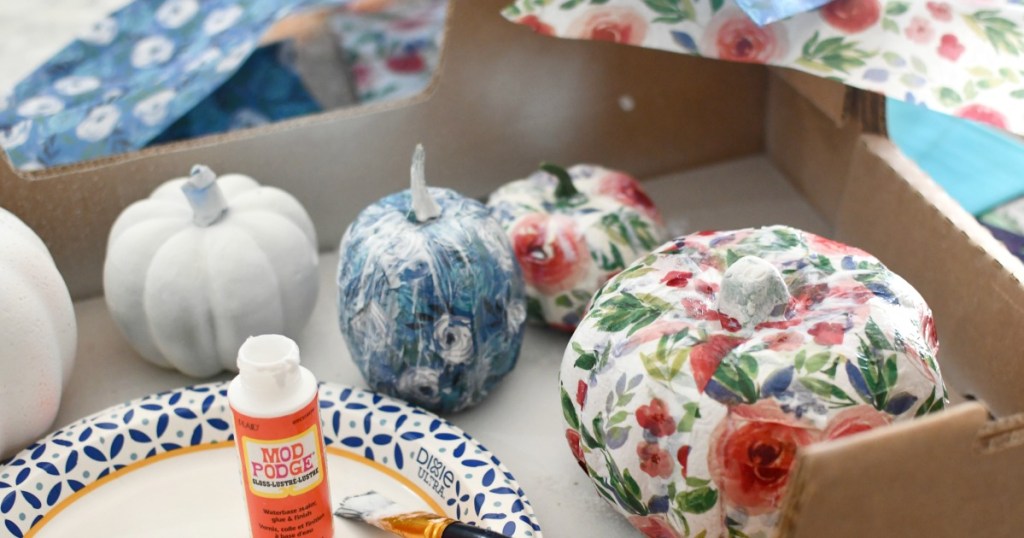
Paint or spray paint craft pumpkins white, and let them dry. Remember, this step is optional only if you want to conceal the orange color.
2
For medium-sized craft pumpkins:
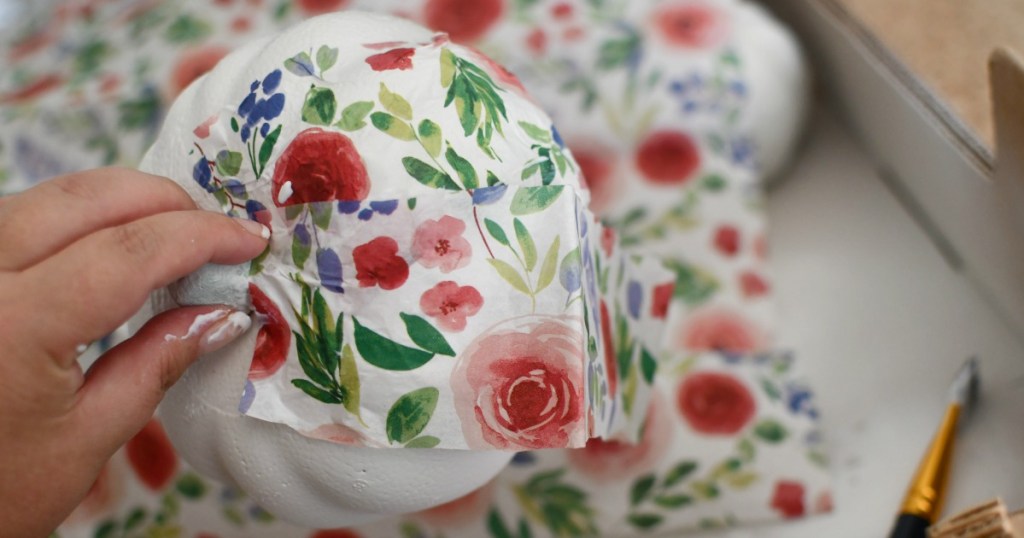
Cut several pieces of tissue paper about 5 inches long and 2 inches wide. Apply a small section of Mod Podge to the outside of the pumpkin. Press the paper down from the top of the pumpkin under the stem all the way down. Press down with your fingers along the pumpkin to lay the paper flat.
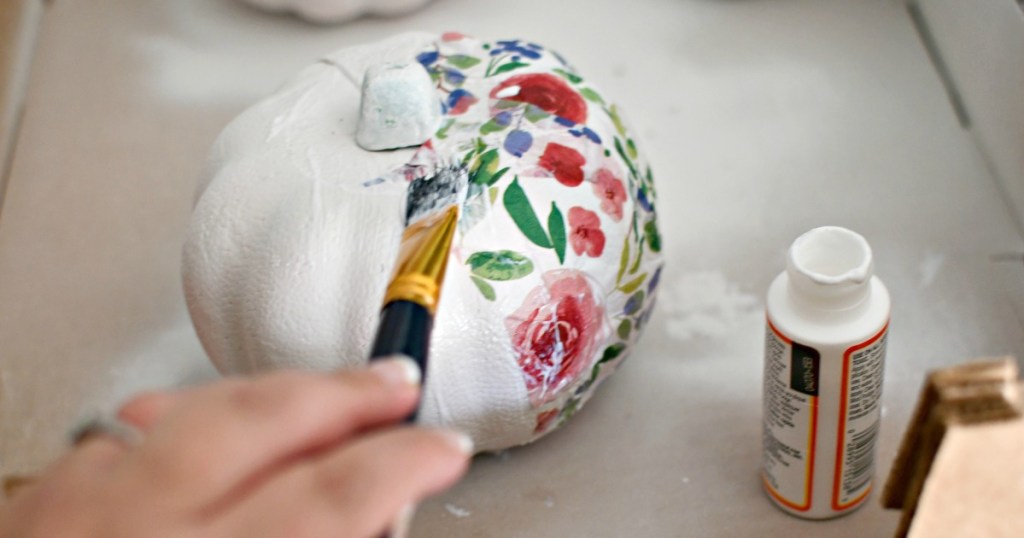
Keep doing that until the pumpkin is covered, and apply Mod Podge to the top of the entire pumpkin and let dry.
3
For the small-sized craft pumpkins:
Simply cut a square-sized piece of tissue paper large enough to cover the smaller-sized pumpkins. Coat the entire pumpkin in Mod Podge. Place the paper over the pumpkin and have the stem pierce through carefully. Press down and cover the entire pumpkin with paper, pressing out all the bubbles with your fingers. Cut off any excess paper at the bottom.
Cover the entire pumpkin with a layer of Mod Podge, and let dry.
4
Lastly, paint the stem with gold paint.
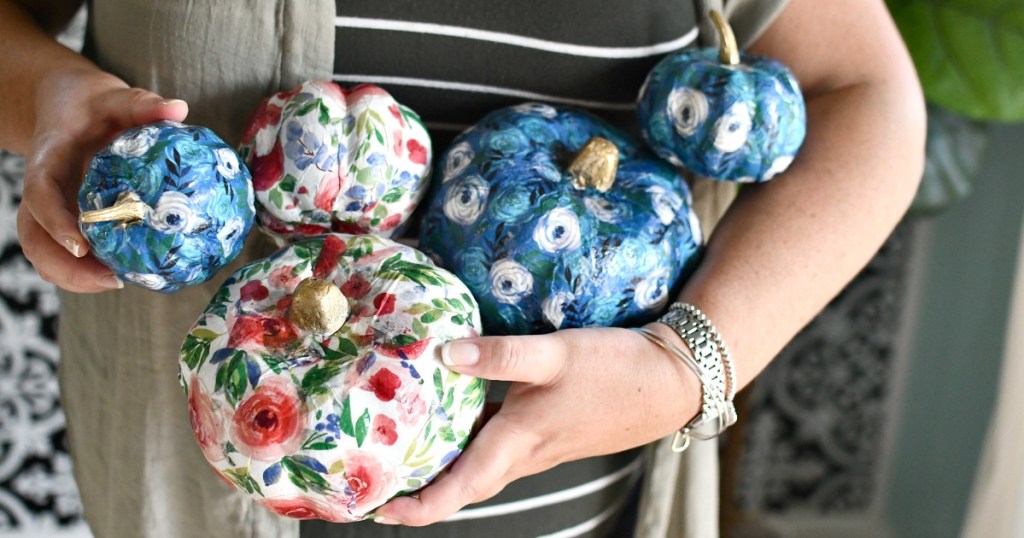
What a fantastic pumpkin transformation!
I love turning ordinary items into something special with a high-end look. These look like they were purchased at a boutique and not Dollar Tree! You could pick any color tissue paper or paper napkins and really customize it for your home decor.
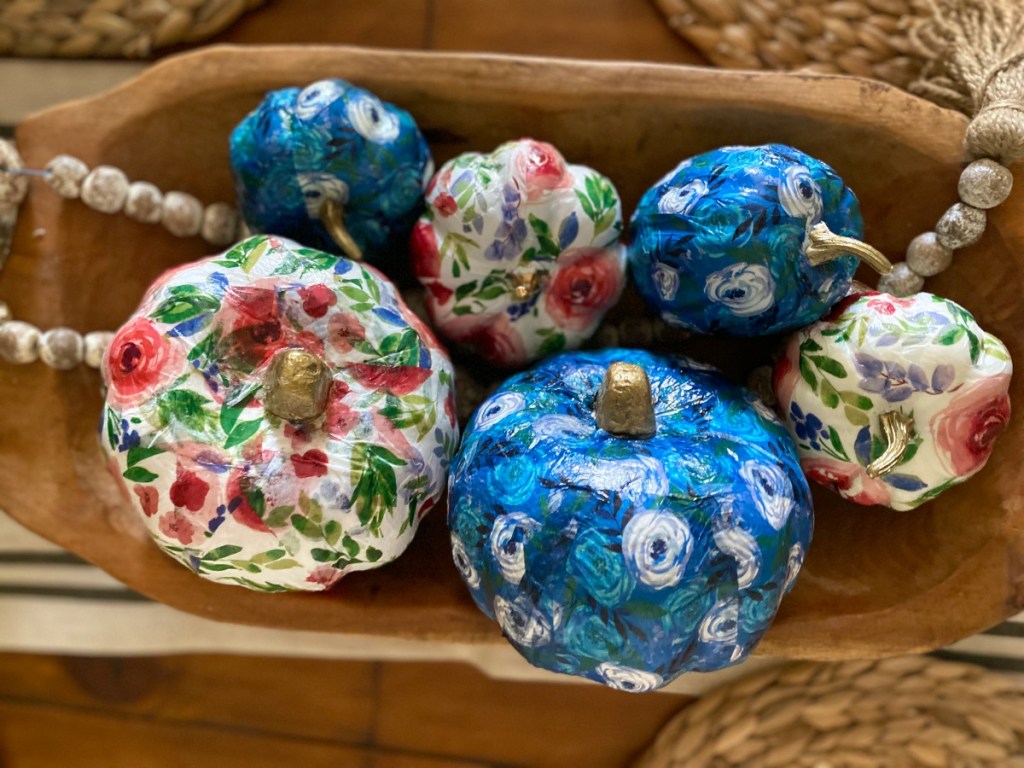
I have my pumpkins displayed with decor pieces I found in a local Mexican import store, but you can check out wooden dough bowls and pretty pottery casa beads to complete this look for your home!
Check out these pretty chalk-painted pumpkins from Dollar Tree as well!

How cute! Will try this with my girls this weekend.
Yay have so much fun creating!
I love this!!
Thanks so much Court!
These are adorable & remind me of the floral decor that was always at my aunt’s house growing up😍
Aw thanks so much!
Just a side note, I bought these same pumpkin’s and spray painted one and it basically disintegrated! Lol So I would definitely choose to paint with a brush over spray paint! But they are adorable and I’m using them for decoration at my daughter’s first birthday party!
Oh fun! Happy Birthday to her!
Yes, you do have to use it sparingly. can definitely use a brush and go to town with craft paint! 👏
Are the pumpkins styrofoam? Styrofoam can’t be spray painted without first treating it with craft foam primer.
Oh thanks for the tip! Some are and some are plastic, I was able to spray mine, but that’s great to know something like that or just use a brush and craft paint as desired.
I am going to try this using a package really cool Halloween printed napkins. I believe the napkins are similar enough to tissue paper that they will work fine. I can’t wait.
Yes! That will be so cute 👏 thanks for sharing!
I used printed napkins using this same technique on a terra-cotta pot this summer and it worked great.
Thanks for the tip Ashley. I was just wondering about doing this on a pot too.
If using 2 ply napkins, separate the layers and just use the printed layer.
Yes it should work fine. I used to do that with Easter eggs and pretty Easter napkins. Just separate the layers of the napkin so you have a thin sheet to work with each time.
Super cute idea!!
Thanks so much Nee!
I absolutely love this! Thank you so much.
Yay! You’re so welcome thanks for stopping by today 🥰
I absolutely LOVE creativity!!! And here here to sharing!!!
Oh yay – I do too. Thanks so much!
So pretty! Thanks for the idea!
Thanks so much!!
I love this simple and cheep idea!!! I can’t wait to do this.
Thanks so much! Yes, its so FUN!
Can use plastic pumpkins? I have some of those to do one thing like this with.
Yep! Absolutely. Some of mine were plastic. They work so great with this project!
Lina, the instructions are sooooo clear and helpful. Thank you!! Will add this to the list of crafts to do. It is so beautiful to look at.
Oh yay thanks so much! Have so much fun 💕
I made these today. Great project.
Oh that’s awesome 👏 Thanks for sharing Ellen!
Made these weekend and they turned out so cute! Per the spray paint, we very lightly misted them white. Orange was still showing they a bit, but just that very light coat was enough for the orange not to show thru.
Oh yay! Thanks for sharing!
I love this!!!
Yay thanks!!
Your the BEST Lina .. thank u for your ideas
Oh yay glad you liked this craft. Thanks for your sweet comment!