
Happy Friday: Frugal Kitchen Makeover
Sent from reader, Erin:
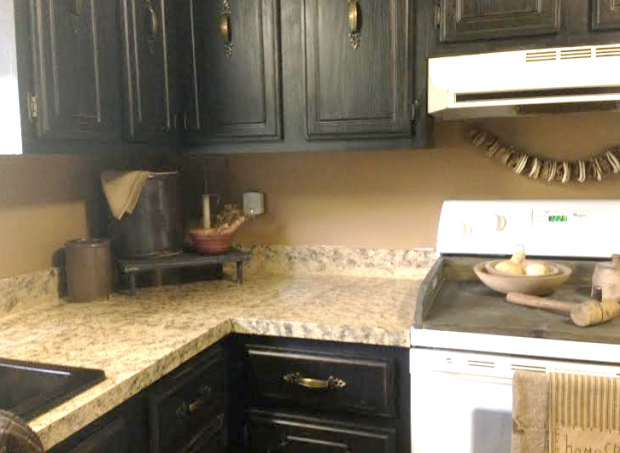
I was never really satisfied with my kitchen – it was very outdated but I never had the funds to do everything I wanted – cabinets, new counter top, replacement of the old silver sink. I had seen the Countertop Kits at Walmart but I realized by the time I bought enough kits that it would be about the same as buying the countertop itself. I was looking around online and saw that another woman had the same dilemma as me but she made her own “Countertop Kit.” So I did the same! I bought 4 acrylic paints at Walmart that I really liked the color of (they were $0.50 a piece!). I also used tintable primer and poly acrylic and a cheap sea sponge and of course Dollar Tree paint brushes! I spent around $30.
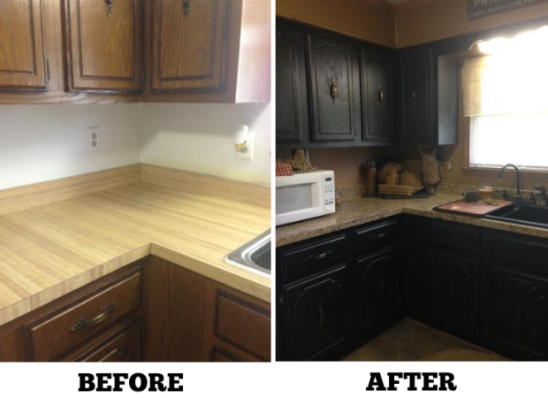
I also reworked my plan and figured I could do something with my cabinets! I spray painted them black and then I sanded the edges because I like the primitive look. Afterward, I applied the same poly acrylic (from the same quart jar). After you apply it to spray paint, it transforms the look and doesn’t even look like paint anymore – my cabinets look like real cabinets! I spent around $15 on this project.
I then bought wall paint at Lowe’s (they didn’t have the base I needed so they discounted what they did have and I painted my whole kitchen and dining room for close to $30!) and thanks to a gift from my In-laws, I got my sink as well! I did a whole kitchen transformation and painted my dining room as well for around $75!!! To me that’s a super hip bargain and I’m very proud of it! 🙂
HAPPY FRIDAY! 😀
Do you have a funny, “Hip”, or unique photo to share?! Email us at happyfriday@hip2save(dot)com. Every Friday, I will post one photo, submitted by you and/or another Hip2Save reader, that gives us a glimpse into your frugal lifestyle or simply makes us smile. If your photo is published on Hip2Save, we’ll email you a $10 Amazon e-card!


Brilliant! Love it!
Wow! That’s awesome! Great job!
Nice job! Looks pretty.
I LOVE it Erin! I have been trying to update my kitchen too, but I like yours much better. You did a great job and should be proud! I esp. Like the way the cupboards turned out!
Thanks so much ! 🙂
Wow!!!!!!!!! So awesome! I love it!
Looks amazing – great job!
AMAZING!!! Wanna come do mine, Erin? Lol
Just out of curiosity, did you sand the cabinets first? Mine have a similar sheen & I keep picturing myself with an orbital sander, coating everything within 200 feet with sawdust. :-/
Thanks so much! No sanding on anything! 🙂
Very thrifty and creative!
Looks so good!
Awesome! You should be very pleased with your accomplishment!!
This looks really good! I only know this because I watch so many show on HGTV, but if you update those pulls with perhaps silver, it will look even better. I only know that from hearing it so much on TV! 🙂
You could paint the pulls, too, if you wanted to.
Your transformation looks fantastic. Well done, Erin!
Thanks!!
Love it!!!!
You should be proud! That kitchen looks like you spent a ton of money on it!! Great job Erin 🙂
Love it! Can you give directions on how you did your counter top? I did mine with a kit and it is scraping off already. 🙁
I wiped my counters down with a cleaner and made sure they were completely dry. Afterward I applied the tintable primer made by linser bullzeye I think it was called with a foam roller brush (I only used the quart size primer and it was from Walmart) pick any base color u like. I let that dry completely. Afterward I went to the beauty section and bought one of those natural sea sponges that had the ragged edges and I cut it up into 4 pieces (I had 4 different color acrylic paints from the craft section at Walmart that I was going to use) I started sponging on the different colors with the sea sponges til I found a “pattern” I was happy with. You really can’t mess it up. Just keep playing with the colors til u like it 🙂 after finishing that and letting it dry thoroughly I did take a small piece of sand paper and barely wipe the counters so the different layers of paint were not noticeable (I just wiped like I would with a kitchen rag) afterward I used a sealant called poly acrylic (it will not yellow in time like polyurethane) I used a foam brush and added a normal amount not spreading real thick or thin. It’s got a whitish milky tint when wet but after setting up its clear. You won’t even use half the quart. I used it on my counters and one coat on my cabinets as well and still had a bout 1/4 Or maybe a hair less- it goes a long way. Let dry and add as many coats as you are comfortable with- I did 3. The more u add the thicker the finish. Let it dry and cure for up to 3 days. After mine cured my husband wanted to test the durability so he took a fork and tried to chip it and mess it up but it was hard as rock and he couldn’t even make a scratch! I use cleaners on mine and everything . Like any other counter top I don’t place hot pans on it but anything else is pretty much good! Hope this helps! 🙂
Amazing! I would be so scared to tackle that myself. Congratulations on such a wonderful accomplishment!
I’m very daring lol I’m one of those who decided at a split second and runs out buys the stuff and does something crazy sounding lol my husband says as long as it turns out and he’s not there to see the crazy process I’ve came up with he don’t care lol 🙂
Okay so I have to ask what is on top of your oven?
Not sure but looks like it might be an apple potpourri garland. I see them at craft fairs often and they smell wonderful.
I think she means what is physically on top of her oven. It almost looks like a piece of wood with handles meant to fit over the burners while not in use.
I googled it and apparently it’s called a “noodle board” that people use as a stove top cover. Love it!
Ah, Ty!!!
It’s definitely a noodle board some may call it a dough board as well. People used them in the old days & they are very popular in primitive, colonial, and antique decorating 🙂
I would love a tutorial as we’re moving into our first home in two weeks and I hate the kitchen but don’t have the funds to redo it. 🙂
I would also love a tutorial!!
Count me in too !! Just loved your kitchen Erin. Great job! !!
Me also. Would love to a tutorial and your kitchen looks amazing. Don’t think I can do it myself but I’m sure DH will help me. Thanks for sharing your project.
Holy smokes!! That looks FANTASTIC!!! I guess my mom was right…”if we use a little elbow grease” and (my two cents – a little creativity) we can do things ourselves. Just imagine what that would have cost if you had a contractor do the remodel!!
Whoops… should be “and (my two cents) and little creativity…”
Looks amazing!!!! Very inspiring! I like the tip with the spray paint too. Amazing job! You definitely getting bragging rights!
Thanks! I’m very proud of it and happy with the way it turned out!
Looks amazing! Great job!
Very inspirational! Thanks for sharing! I love it!
wow I would love to see a video tutorial or more details of how to do this! Thanks for sharing this!!
I gave the complete step by step in two of the earlier comments 🙂
That looks amazing!
Wow! That looks amazing!
Love it! This is very inspiring!
That looks great. Job well done!
OMG, that is my kitchen exactly! The butcher block counter tops the cabinets and even the hardware are exactly like the ones in my kitchen. Kudos to you for the makeover. Job well done!
Great Job. You should be really proud of it and yourself!
wow. that is awesome. we need to redo our kitchen but don’t have the funds for it. I am going to send this to my hubby.
How are the countertops sealed against water? Also, what kind of detergents can I use to clean it? Does it hold against abrasive sponges?
Also could you post a close-up of the countertop?
The poly acrylic I used is a sealant very similar to polyurethane. It seals from water. It’s basically a clear coat. The more layers the thicker the clear coat the more durability you get. I did some research and surfers actually use polyacrylic to help protect their boards from water damage. My counters have held up great. I’ve used bleach and other harsh chemicals. I’ve used sponges and magic erasers as well but I’ve never used any super abrasive things like steel wool or anything. Not because I thought it would hurt I normally just don’t use that type of sponge 🙂 it sets up very hard. The more poly acrylic u use the more time it may need to set up. I used 3 coats and it was a three day process for me. My husband tried to scratch it with a fork and damage it on purpose to check the durability and he didn’t even Make a scratch 🙂
great job!! I would love to know step by step how to make the countertop.
I replied with a tutorial to an earlier comment! Check that. hope it helps 🙂
Wow! Great job it looks great.
It looks beautiful! Amazing job.
It is not as inexpensive as this, but I can vouch for the Rustoleum Cabinet Transformation they sell at Lowe’s/Home Depot (they also have Rustoleum Countertops) It runs about $75, I think. Comes with instructional video & a bunch of different color options. You can also see a lot of transformations on their website to see the color options even better. And NO sanding!
Did you read the article? lol she didn’t use the expensive pre-made kits.
Looks incredible!
Impressive. You really did a good job.
Awesome job Erin! It looks beautiful!
Looks amazing for the amount of money you spent, great job
Looks very, very nice. Like they say…”if you want something done, you have to do it yourself.” Nothing like the satisfaction.
Totally agree!!! 🙂
Pinterest is a good place to look. DIY counter tops. I’m leaning towards the sand look.
What an amazing transformation, that is so great!
Love it! We just moved into our first owned home and I’ve been very busy decorating on a tight budget. Amazing how much you can get done if you have the time and willing to put some elbow grease into it. I redid the kids’ bathroom amd the guest bathroom. Main bath next, then kitchen!
New pulls can be very expensive. We have a Habitat for Humanity resource store in Cleveland, OH, and that really helps us save money on remodeling.
Wow, nice job. From the picture, the countertop looks like granite. I agree with all the posters, you definitely have something to brag about,and the final cost is also amazing. Being adventurous definitely has its rewards 🙂
My mother in law has the Formica faux granite from lowes and she even says our countertops are very similar if not almost the same 🙂 I was very happy with the finished product 🙂
Wow! Very nice job! Some people are so talented!
I think the walls would be nice painted a light robins egg blue!
I love light blue and antiqued black (your cabinets) together… But…. you did an amazing job as is!
Wow Erin, you did an AMAZING job! Way to go!!!
Great job! It looks awesome way to be self provident! Can you come do my kitchen now, oh and my bathrooms 😉
Enjoy!!!
Jess
Awww thanks 🙂
Amazing creativity! Great job!!
Wow – beautiful job and definitely a ‘super hip bargain.’ Way to go!!
What a beautiful kitchen! Are you a interior designer because it sure does look like it. Everything goes together perfectly! You should be very proud of your new kitchen. I hope you don’t mind but I’m going to use your photo and my inspiration! Just gorgeous!!!
Nope I’m definitely not a interior decorator lol but I do love to decorate and look at magazines like The
Simple Life and Country Sampler and get inspiration from other sources. Then I just work with it and keep rearranging and trying things out til I’m happy with it 🙂 I’m always moving around something lol 🙂