
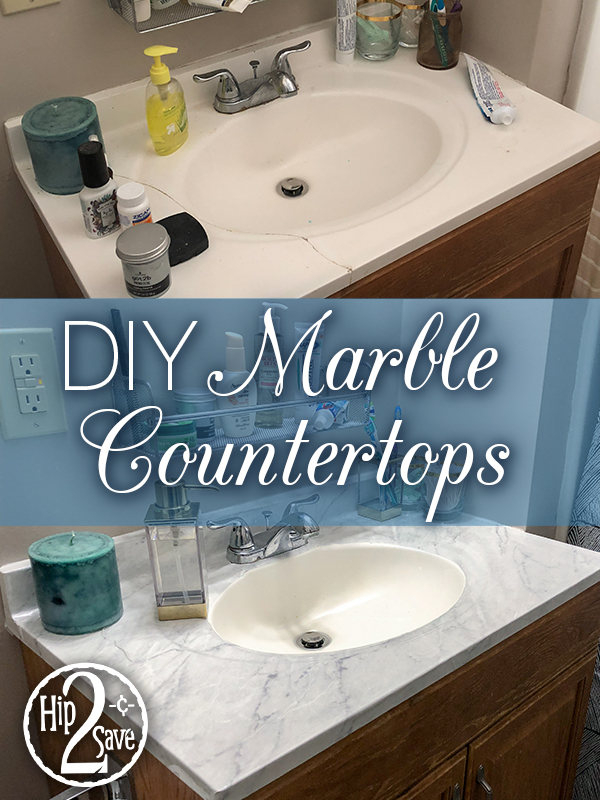
How I Transformed My Ugly Cracked Countertop For CHEAP
Hi there! I’m Emily, one of Collin’s savvy sidekicks!
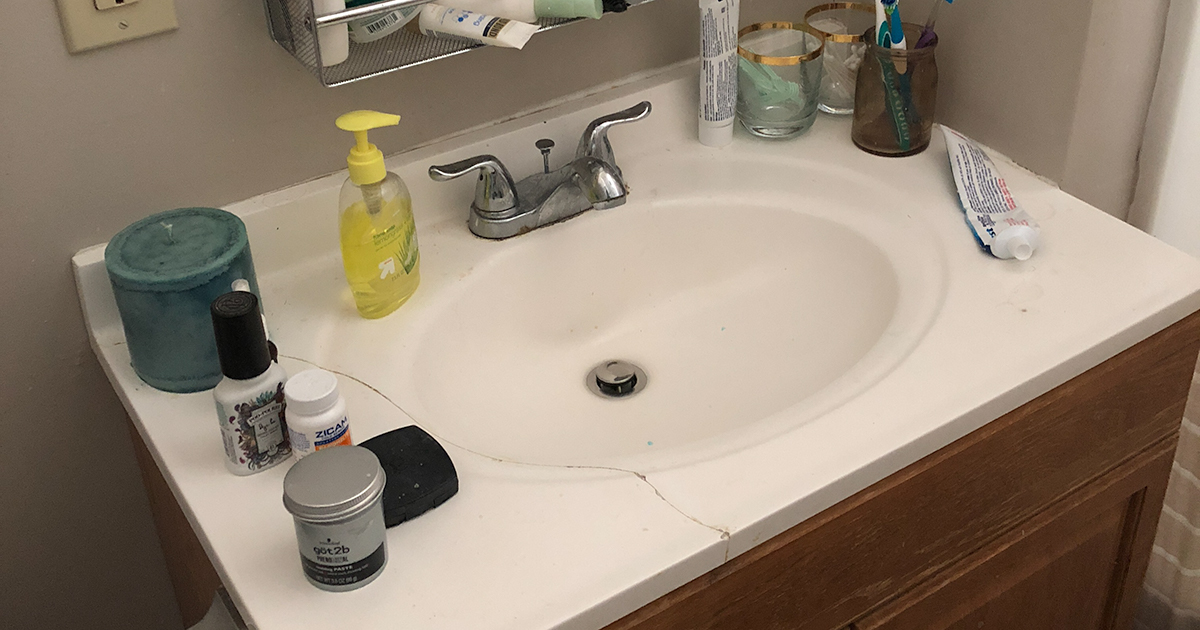
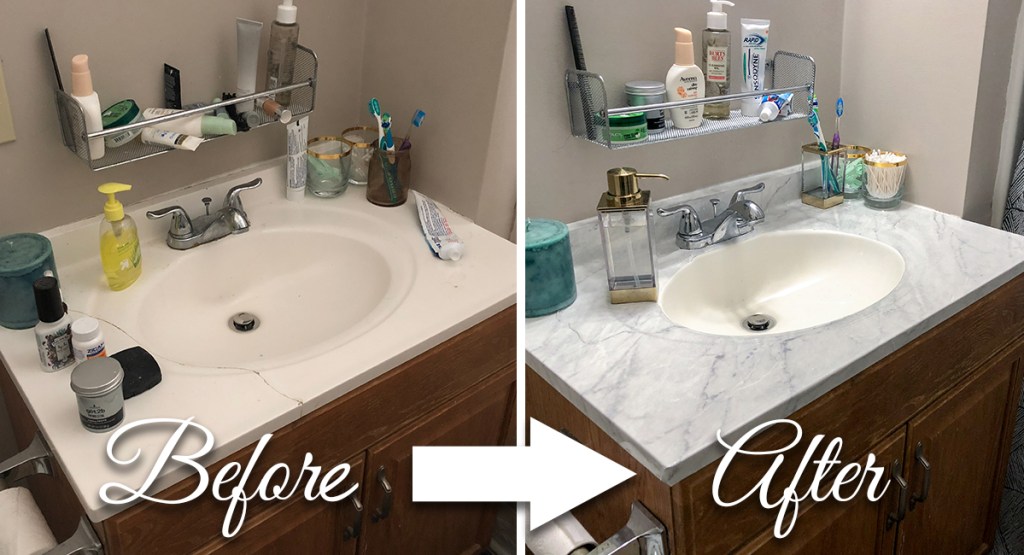
I like nice things, but I live a pretty frugal life. So when I decided that the massive crack in the off-white countertop in my very dingy looking bathroom had to go, I needed to get creative. I’m not about to replace a countertop, let alone in a rental, so after remembering the countless pins I scrolled past on Pinterest, I ordered some marble-look contact paper to try my hand at “refinishing” the countertop.
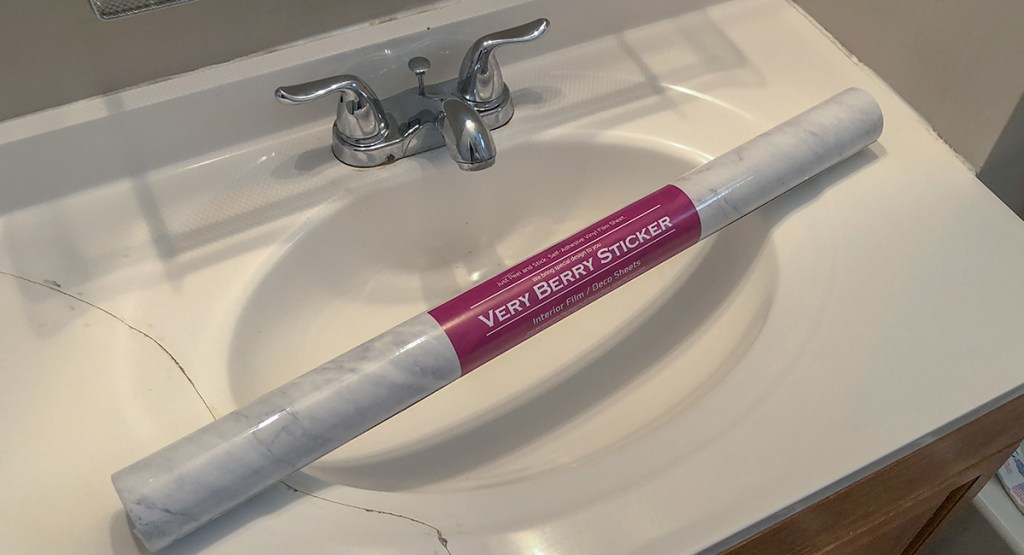
I chose this marble contact paper by Very Berry Sticker because it had great reviews, seemed very durable, and had the most realistic looking marble print. Even though it was relatively inexpensive, I didn’t want the end product to look cheap. Score one for me, because this paper turned out to be seriously thick, has a rich, glossy sheen, and looks so natural – unlike the other pixelated marble papers I’ve seen.
So now to the part you probably came here for – the tutorial.
I am NOT a pro-DIYer (Lina is your gal for that 😉) but I do love fun DIY projects. Keyword: fun. I really wouldn’t categorize this DIY as fun. Making pretty jewelry to give as gifts = fun. Decorating wine glasses with your girlfriends = fun. Spending an hour and a half in a small bathroom cursing at a countertop = not so fun.
BUT, I would do it all again because the countertop actually turned out decent!
Here’s my tutorial – the good, the bad, and the ugly…
1.) Clean, clean, clean! And if you think it’s clean, do it once more.
No seriously. Clean once, then do it again, and then even a 3rd or 4th time. My cleaning process involved an all-purpose cleaner, then bleach, then vinegar, then alcohol. There was no method to my madness, I just really wanted to make sure it was super duper clean.
2.) Measure, kind of, and cut along grid for straight-ish lines.
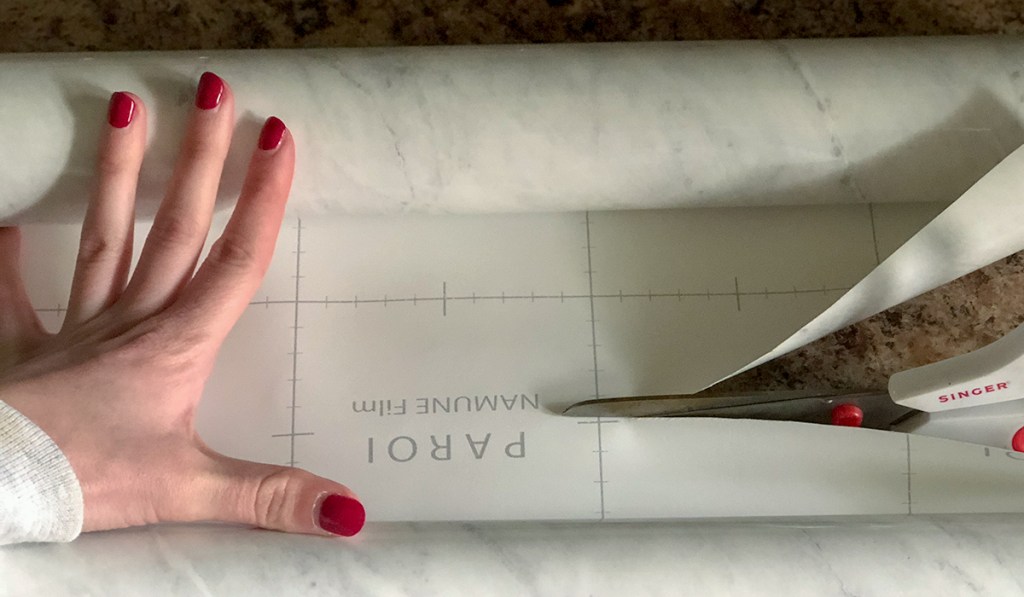
There are 2 methods to this: measuring the countertop with a measuring tape and relaying those measurement to the paper, or trying to spread the paper over the countertop and eyeball where to cut. I chose the second option, mainly because I forgot measuring tapes existed for this purpose.
The paper has a grid on the back to help cut straight lines which was super necessary for my plan of attack. A helpful tip – err on the side of more vs. less so you can make sure the paper exceeds all edges.
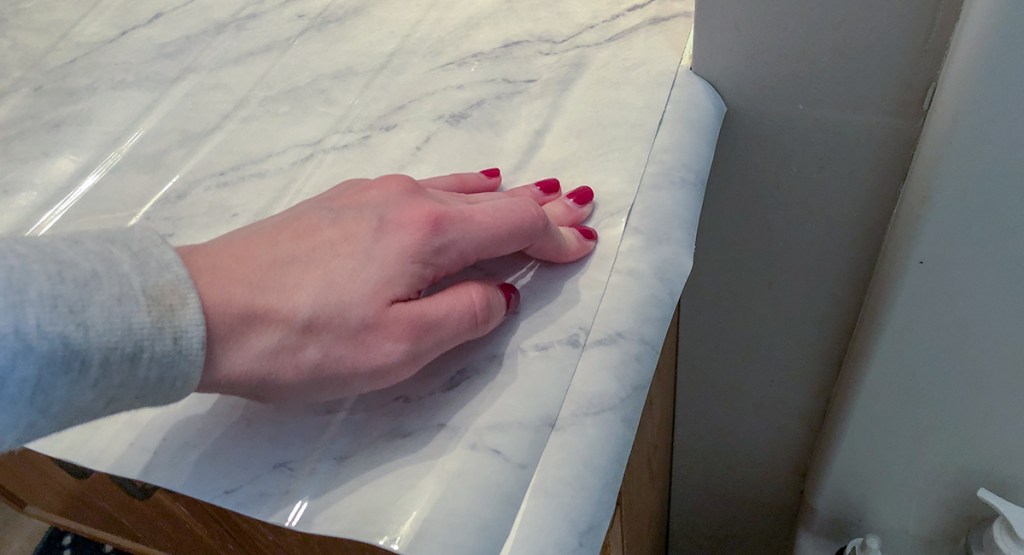
3.) Choose your starting point, preferably a corner (your paper is not Baby from Dirty Dancing).
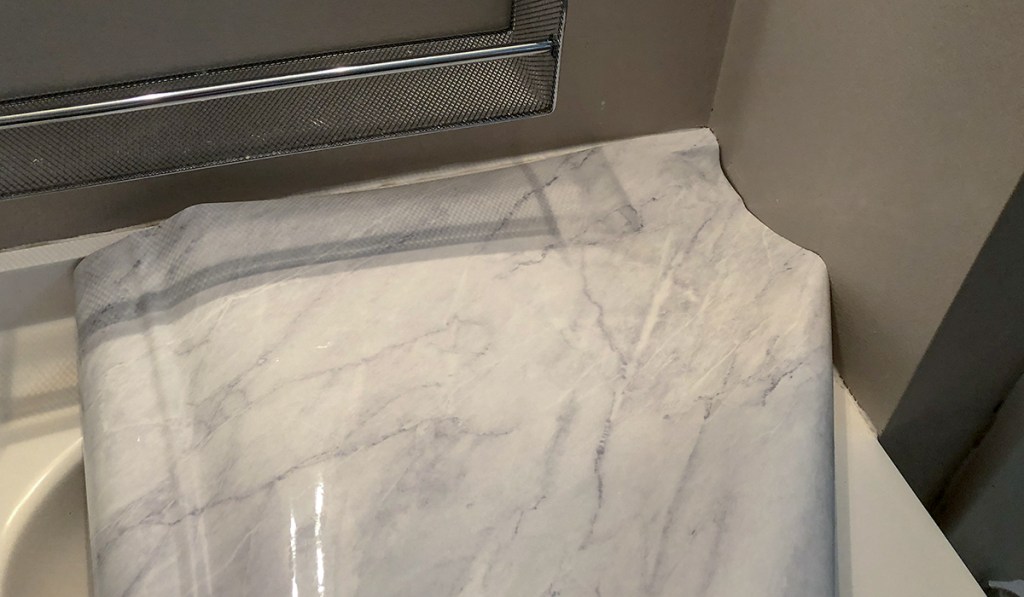 I started in a corner (I recommend this) and worked very slowly, only peeling back small amounts of the underlying paper. Then I worked the contact paper down with a flat plastic putty knife (I also recommend this) to avoid any bubbles. You could probably also use a debit/credit card, a pancake flipper, or a piece of cardboard from your most recent Amazon purchase. Get creative!
After 5 seconds of fun when I stuck the first piece down, I quickly realized that this marbled covering isn’t the easiest medium to work with. That “Yay, this is so thick and durable!” excitement quickly shifted to “Why is this so impossible to manipulate!?” That was when the swearing started, and I totally started to regret spending my Sunday afternoon this way.
4.) Continue laying down paper and close the bathroom door if your vulgarity heightens.
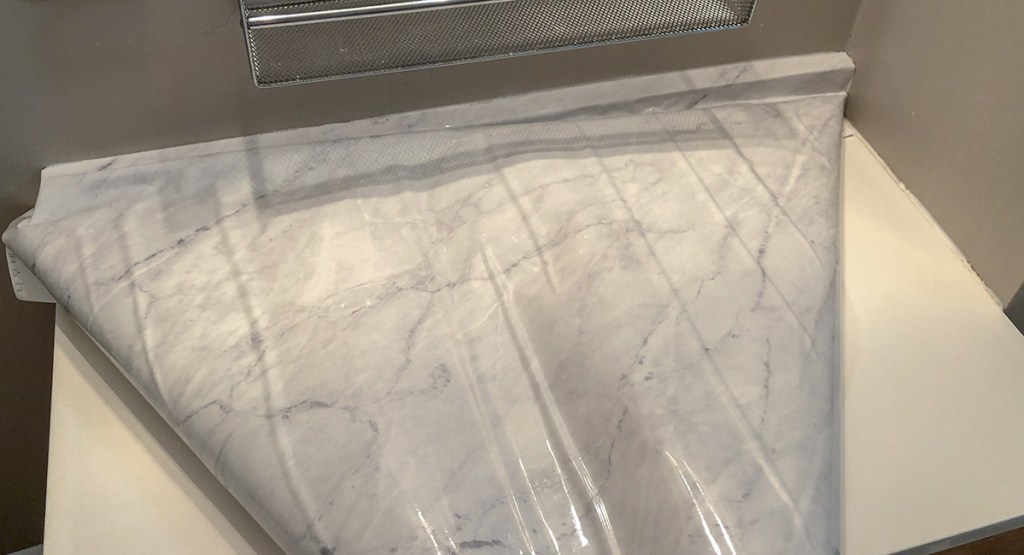
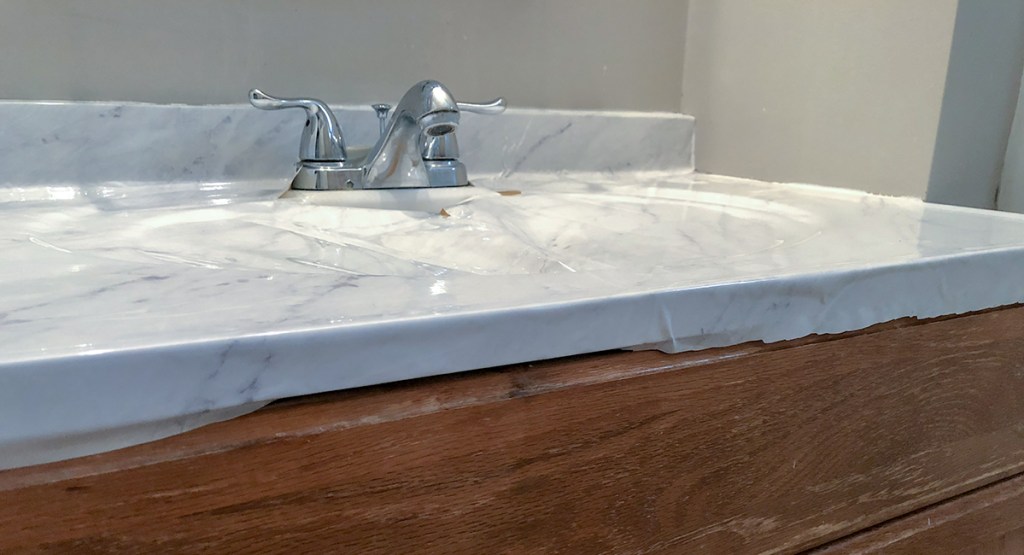
After finishing the edge along the back of the countertop, I pressed the contact paper down the front edge of the mini backsplash, where, of course, I started to see some wrinkles and bubbles… just great. Could I have been more diligent about not stretching the vinyl and worked a little bit slower? Sure I could, but I’m human, so it happens. I decided any wrinkles from this point on were “3D marble veins” and got over it pretty quickly.
5.) Cut out the faucet area and make note to invest in proper tools next time.
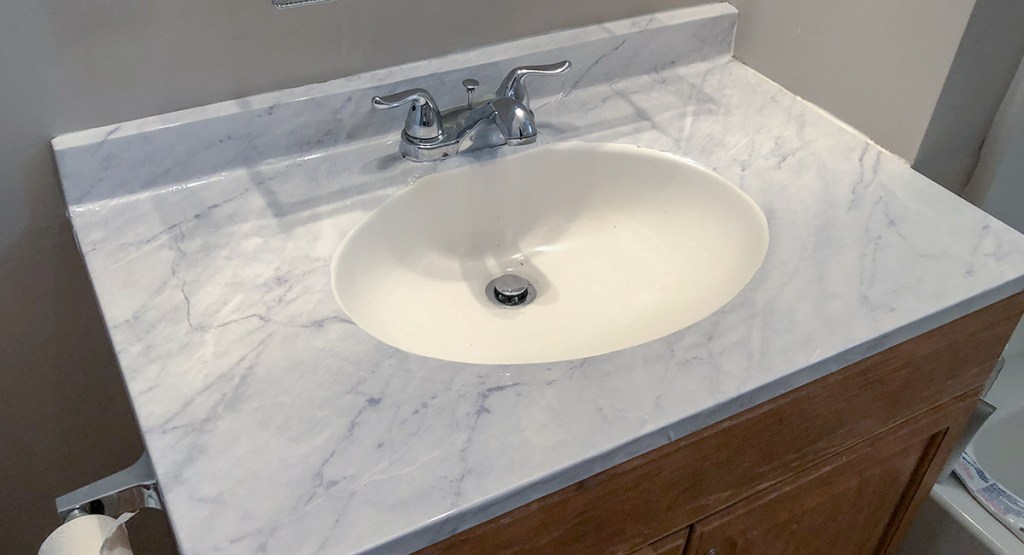
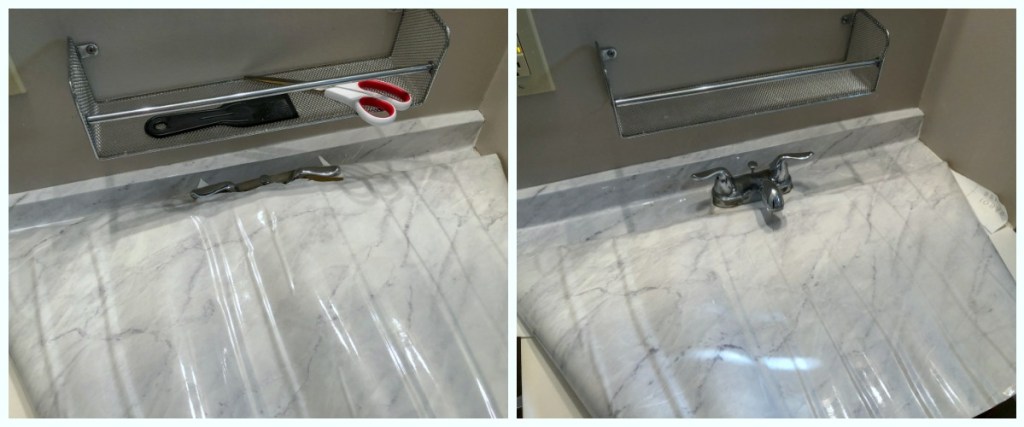 You’ll see from these pictures that I left the faucet fixture intact (other tutorials specify to remove it, but I seriously don’t have time, expertise, or any care to do that). I [sloppily] cut out an area so the faucet could pop through and planned to work on trimming that area last.
Oh, I also didn’t have an X-acto knife on hand, so I used a paring knife from my kitchen (I do not recommend this) for cutting the paper. These, as I experienced, are not interchangeable tools. Do yourself a favor and use an X-acto knife.
6.) Fix mistakes as you go – they are inevitable.
As I was working my way down the counter, realized that I was off-center and the vinyl wasn’t touching the starting edge. I trimmed a piece off from the roll with the marble veining angled in the same direction as the rest of the counter and laid that down where the main piece wouldn’t reach. This way, the rest would overlap. Honestly, it was such a small area, it really wasn’t noticeable at all.
7.) Remember to take pictures if you’re posting this as a DIY tutorial.

After that, it was smooth sailing, for the most part. So much so that I forgot to take pictures to use in this tutorial – I was on a roll, people!
Working steadily and evenly across the whole countertop, I laid down the contact paper, smoothed it out with the scraper, and figured I’d deal with the fact that I had completely covered up the sink basin at some other point. There were some bubbles here and there but I “popped” them with my knife by making a tiny hole in the center and pressing the air out.
As I neared the end, I saw a MASSIVE wrinkle forming right in the center. Since it was up to the front edge of the countertop, I just cut straight through the potential wrinkle and let the vinyl overlap as I flattened that section down. Trust me, if you make it this far, any desires of perfection fly right out the window and you’ll just be proud you finished.
8.) Hack off the excess paper and roll underneath countertop edge.
This was probably one of my favorite parts, not only because I was so close to being done, but it didn’t require a steady hand or precision. No one’s going to see those choppy cut lines from trimming the edges since it’s rolled underneath the edge of the countertop. Well, that is unless someone is lying on my bathroom floor at an angle to view them, which just means that I have bigger problems on my hands than sloppy trimming.
9.) Don’t forget there’s a sink under there!
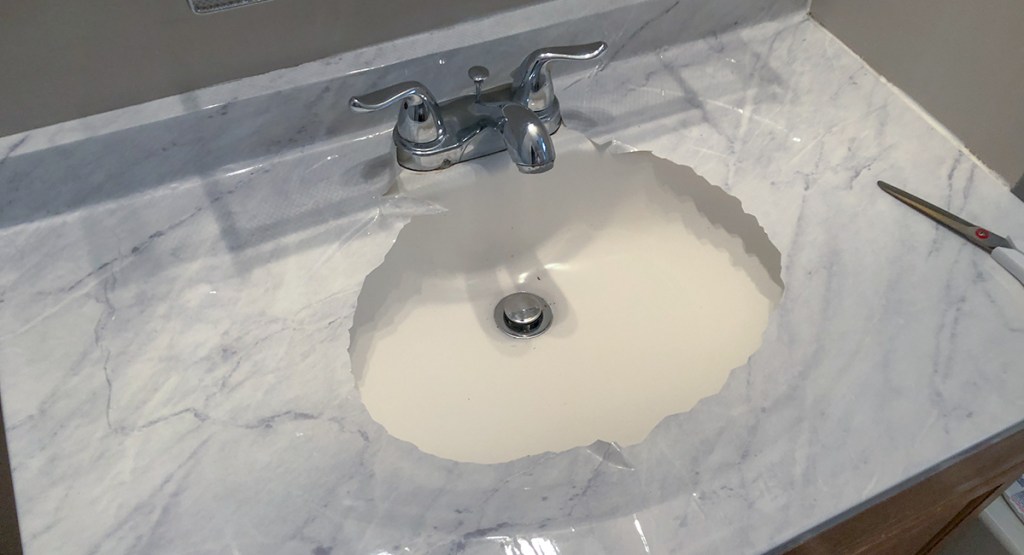
I debated rendering the sink obsolete because it looked really pretty with the marble stretched across it. Unfortunately, my boyfriend would not allow that, so I kind of just hacked into the center of the paper covering the sink basin with the paring knife and worked it around to get closer (but not all the way) to the edges. It really wasn’t doing the trick so I upgraded my paring knife to a sharper steak knife – again, the X-acto knife would have been great here, but I was not abandoning this project until it was finished.
I held the knife flush with the basin at a 45º angle and ran it around the edge. It glided pretty smoothly with a few catches here and there, but overall it worked.
10.) Trim up paper around the faucet area and give yourself a big ol’ pat on the back!
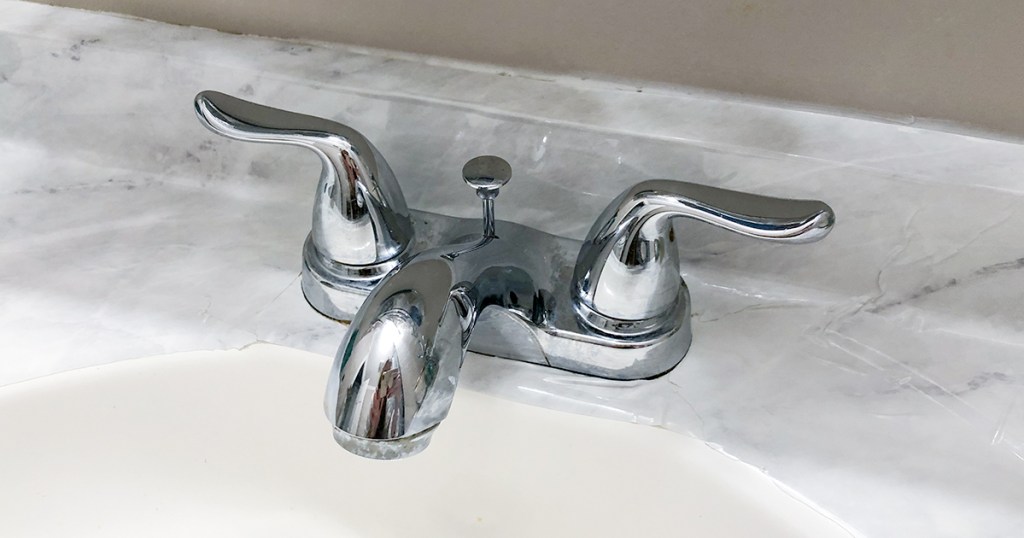
I went back to the faucet area and used the steak knife to cut off the excess around the bottom. This is probably the messiest looking area since I had to lay some small additional pieces of contact paper (similar to what I did for the edge that didn’t reach) to make sure everything was covered. Either way, it still looks a trillion times better.
And, voila!
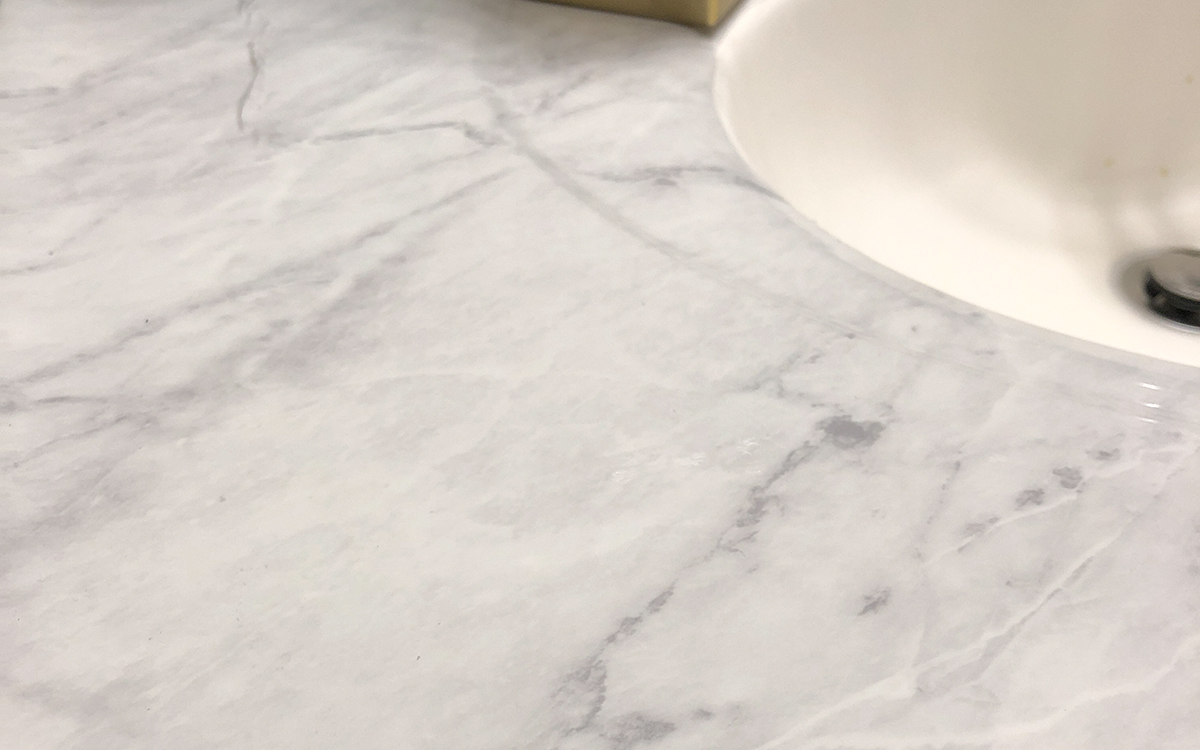
Guys, it’s finally DONE! Is it perfect? Absolutely not. Did I think it was going to take me an hour and a half? Absolutely not. Was it worth it? Absolutely!
To jazz up the counter ever more, I bought a new soap dispenser and toothbrush holder to finish off the look. Oh, and if anyone thinks I care that the gold accessories don’t really match the silver hardware, I don’t. They’re really pretty on their own and they were on sale.
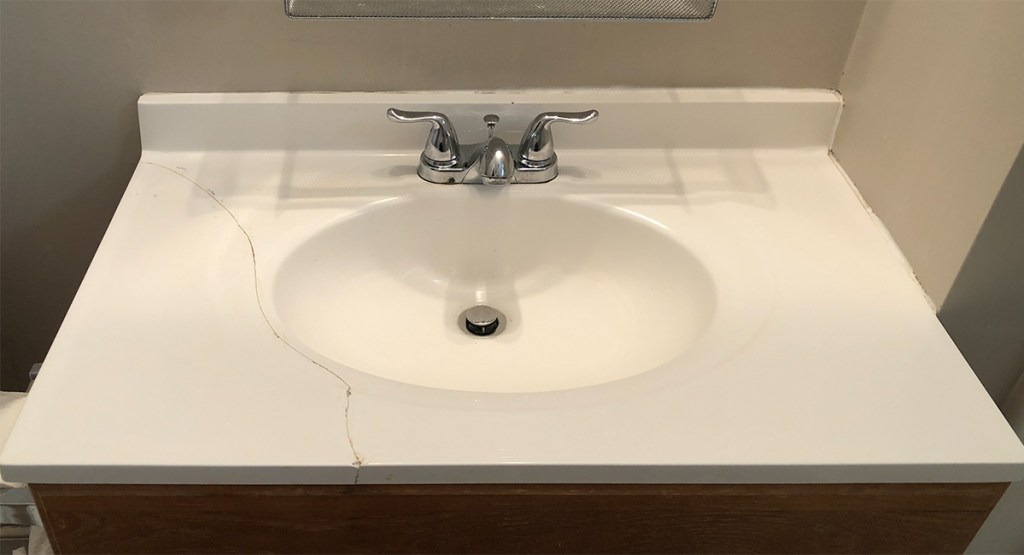
My final thoughts: This project turned out just as nice as I thought it might, though it did require more effort than I imagined. It probably would look a lot cleaner on a countertop where the sink has a bit of a lip around it instead of being one smooth piece that flows into the sink basin, but I’m working with what I have.
Also, I have a TON of paper left, so I’m going to search my apartment for more user-friendly (read: completely flat) items I can refinish next. We just had the kitchen redone, though I’m sure this would be amazing on kitchen counters. Come to think of it, I do have a few scratches on my coffee table 🤔 …
What do you think of my “refinished” countertop? Is this something you’ve tried in your own home?
Written by Emily for Hip2Save. Emily lives in Buffalo, NY where she spends her time drinking lots of coffee, scouring the internet for deals, and tackling DIY projects. She’s a big believer in self-care and living the fullest life possible, all while saving money of course.

When I bought my first condo, I did the same thing with my kitchen countertops. People did not believe that I used Contact Paper! Yours looks great!
Thank you so much, Wendy!
It looks amazing, Emily! Such a fabulous hack!
🤗Thank you, Jane!
wow, didn’t think you can put that on a sink, pretty kool. that’s nice for a temp fix… being that it’s a temp fix you can do it in other designs the next time … awesome
Right?! There are a TON of patterns and styles on Amazon, you can get pretty much any counter finish out there!
I’m gonna try this!!👍🏻😁
my parents had old old old metal cabinets in their kitchen. They covered them with a wood grain contact paper and it looked a lot better for a while… it has faded though and they also learned to invest in large cutting boards after the paper on the countertops became riddled with pokes and slices.
Is there any kind of bonding spray you could spray over it when done? Like a modge podge type of thing ?
Nope, the vinyl is crazy durable and feels like there’s already a coating on it since it’s very smooth — just apply the contact paper and it’s done!
SUPERB WORK!
Great job!! Everything is looking nice.
OMG, you literally had me laughing out loud at some of this… I was somewhere in between ‘Wow this looks really cool’ and ‘Is this an April’s Fool’s joke?’ LOL. I think it came out great, despite any vulgarities and not having proper tools. You are a hoot!!!
Also, I just checked the link to Amazon just to see pricing on this, and was looking through reviews, you can literally put this stuff on ANYTHING, and by anything I mean I actually saw a review where a woman covered a mouse pad with it…. i just can’t even…. lol
Haha thank you Amy! It was definitely more work than anticipated and my patience is veryyy minimal, hence the struggle. Glad you enjoyed it!
It looks great!!
If it’s a rental why wouldn’t your landlord repair it for you?
Well, the crack is technically my fault sooo I’m just avoiding that conversation 😳at least until I move out!
May I ask how a crack like that could (theoretically, of course) happen. Too much weight on it?
Bingo. The countertop is kind of shifted how it’s placed on top of the cabinet and isn’t totally supported so leaning on that side too much while fixing a faucet issue caused the crack 😞
I hope the landlord is understanding. It often happens that when you try to fix one thing, another thing breaks.
looks good!
Looks pretty good.
Has anyone tried painting with the rustoleum countertop paint? It’s like $20 for a bucket and you can get it tinted a bunch of different colors.
Or, has anyone tried the giani Countertop paint, or the Rustoleum transformations, etc.? These run about $75 and are supposed to make your countertop look like granite, marble, etc.
I think I’m going to try something. Just not sure what yet.
I painted then epoxied mine. I blogged about it at thefrugaldribbledotwordpressdotcom
I’ve got some giani stuff in my closet (I’ve had it for well over 2 years 😳), but I’m afraid to use it 😂
My sisters boyfriend just recently redid their kitchen countertop that was a funky yellow laminate. When my sister moved in, she didn’t have enough $$ to redo the kitchen. After 2 bedrooms and 1 bathroom update, it cost more than she initially set aside, so the kitchen had to wait. Fast forward 2 years and a new boyfriend that is Mr Handy! He applied something called SpreadStone. It was very easy and totally transformed the kitchen. It was $125, and redoing the kitchen with marble was gonna be a heck of a lot more! It was so easy, my sister (who is not a DIYer!), was able to help.
https://www.homedepot.com/p/DAICH-SpreadStone-Mineral-Select-1-qt-Oyster-Countertop-Refinishing-Kit-4-Count-DCT-MNS-OY/206349259
Thank you Mel! I checked out your link. This looks amazing 🙂
I did the rustoleum countertop paint on my boys bathroom counter – and mixed a little bit of fine glitter in it to give it a glistening look. (very little though, b/c they are boys). It has been at least 3 years and it still looks fantastic. It has a bit of a texture to it, so I don’t think it would look as nice over a large area, but they have a double sink vanity and it looks great and has served its purpose well.
My husband and I used the Rustoleum on all the kitchen counter tops and it looks like we installed granite. Amazing and inexpensive!
My favorite was “no photo available”…hilarious! Great post. Thank you! It looks great, by the way.
😆Thank you so much!
This looks great! I did this once with a classroom sink that had seen better days and it lasted about half the year, at which point I redid it. If you like the marble look, there are paint kits that would solve the issue, even with the cracked area I think you could mask the imperfection fairly well as marble is variable to begin with. Great job!!
Thanks! Yeah, I’m not really sure how long it will last (if it makes it a year I’ll be happy with it) but it’s a great temporary fix!
Ha Ha, you are a riot!! I’m laughing so much after a long time! This was by far the BEST DIY post I’ve read!! You have a way with words and are quite a story-teller!
And the best part, is that your sink looks lovely!!
Congratulations!!
I was thinking the same thing. I don’t need to redo a sink, but I kept reading because of the comedic tone.
Much appreciated 😊I really lucked out with the final product given my not-so-stellar experience. Glad you enjoyed it!
Looks great! Interested in looking into this for our vacation cabin…hello 1970’s yellow countertops!
Haha yes! Such as easy upgrade to dated counters!
I had no idea this stuff existed! Good job!
I’m looking to redo my bathroom and I came across your site and I loved everything that you had done I’m interested in doing the cover-up on the counter in the bathroom the only thing is my counter top is tile and I was wondering if you had any suggestions on that? When I bought the house I know they updated the shower but the vanity and the sink and countertop were not.
Thank you
First, it looks great! Second, your tutorial was hilarious! Third, just a couple of additional ideas. My 20yo daughter used this exact same contact paper about a year ago when she repainted her bedroom gray. She used the paper to cover and accept several things in her room: top of her nightstand, top of her vanity (actually a white computer desk) and the tops of the head and footboard on her sleigh bed (to cover the brown accent wood, because the rest of the bed is white). I had to help her with some of the corners on the furnture because it was tricky to get as smooth as possible, but it turned out great!
That’s awesome Michele! I feel like that will be me soon trying to cover everything with this stuff — just as long as it’s a plain, flat rectangle and won’t be a headache to DIY lol
I did this on my kitchen island but with a granite design. My uncle, who sales granite, did a double take when he saw it. He was impressed with my frugal hack. Kuddos to you for your successful DIY project! BTW, I also use makeshift tools when I’m on a mission to complete a project. I like to call it creative problem solving. 😊
Just in case anyone decides to follow this tutorial…you should never clean the same surface with bleach and vinegar, one after the other. You can create chlorine gas, which is highly toxic (and in a small space, can be fatal). I know it’s unlikely to happen, but it’s not worth risking it!
You can clean with them sequentially, you just have to make sure that the surfaces are rinsed and dried before applying the next. It’s unlikely a solid surface would absorb much of either chemical, and the amount of gas you *might* produce would be inconsequential (not to mention you’d feel it in your eyes and throat pretty quickly). I would have died a thousand deaths by now otherwise since I use multiple cleaners in my bathrooms 😬😂
I did this with my kitchen and faux granite with paint in my bathrooms. completely changed my home.
I always use this floral adhesive shelf liner in kitchen all drawers,cabinet,platform and now recently I also put it all around oven wall so that I can easily peel it off and use new instead of scrubbing and doing hard cleaning.But this needs agreat attention to apply without any bubbled.
I think my favorite part of your tutorial is when you got the steak knife out to trim the edges around the sink 😂
How hard would this be to take off? Would it leave a sticky residue or is it like vinyl? This looks great and I wanna try it on my rental kitchen counters!
This was great, that sounds like me during 99% of the projects I tackle lol. I may have to try this…I have ugly counters & a landlord who lives far away & couldn’t care less lol. I had looked into some of the painting techniques before & this seems way more doable for me. Now I just need to find a fix for ugly hardware/faucets etc…seems like they replaced half of ours & the rest is nasty gold that is barely identifiable as gold these days.
they have spray paints for faucets…
I get that it’s a cheap diy fix… but by the time the material & accessories were purchased, it would have just been better to buy the $44 new white countertop available at Lowes. I get that it’s more work to swap out the whole countertop (reinstall faucet & sink drain) but probably less time & less curses (assuming you know what you are doing) and better long term fix, for about the same money.
Yes definitely! Considering the landlord is probably going to charge for that crack anyway…
Best DIY post I have ever read!! Love the no picture part!
Thank you, Chris! Glad you enjoyed it!
Hilarious. I want to read more of your submissions.
Nice Job.
Keep your eyes on Offer Up and Craigslist. You’d be surprised how often folks are giving away sink tops for free.
Usually following a recent renovation. You might just get lucky.
I just replaced the countertop ONLY for $99. I purchased it on a Black Friday. I believe it was a 36″ countertop. I love it. It’s the same color as the paper above. Great deal and worth it. Much cheaper than replacing the entire vanity.
Awesome idea!
Advice on mounting from a graphic designer who’s mounted thousands of posters in poster boards, foam boards, etc.
There is a tool called smoothing tool. They are not too expensive. That will help you get rid of the bubbles. I think the credit card is too flimsy for this job.
The best way, for a job like this is to have a second set of hands. They can keep the end of the paper somewhat to straight (tension is important) or more importantly to make it easier for you 🙂 so you peel a little bit one corner and position it in place. Stick it there and then with one hand start slowly to peel the backing while with the other start smoothing with the tool. The movement should be towards the part that is not stuck yet – you just push the air away. If you work slowly it would be less prone to air bubbles. Again, this is a tricky surface and having help would make it easier.
If you get bubble and it bugs you – get a pin and prick it. Then use the tool to get the air out.
Another advice (not sure how it would work on this vinyl) is to add few drops of soup in water and using a spray bottle to spray the counter (small areas at a time so it doesn’t dry out before you get to it) because of the soap, the vinyl doesn’t stick right away and you can reposition it if you made a mistake.
Don’t mind the mistakes – my phone apparently decided to auto correct randomly.
Hilarious post!!! Loved everything!!!
Best DIY and so funny!! Looks amazing
I did this in my first house with a countertop we called the goldschlagger. I chose the same marble paper, 1997.
I did spread stone, bought through Houzz.com. Looks great!!
Wow! Very impressive. Congrats.
Thank you, Mary!
You did wonderful!!
Yes, it looks great!
I love your humor Emily. Good job. 💖💖💖
Thank you! Glad you enjoyed it 😊
funnest dyi ever!
I did it in my apartment on the whole kitchen counter. I used black marble color. So when I was moving, 10 years later I just pulled it off and counters were like brand new.
I don’t need to refinish any countertops, but I love before/after pix. Your counter looked better, for sure, although you’re right about the xacto knife. As an old-school graphic designer, I tried to imagine cutting type with a steak knife… Steak knife DIY skills aside, what was truly brilliant was your writing style. THAT I absolutely loved! Humor is hard to convey in writing, but your clever wit touched my funny bone more than once, and believe me, that requires extraordinary skill. I’m sure you’re proud of your sink, but as they say, “don’t quit your day-job”. 😉
I am so glad you enjoyed it, Jill! And you’re so right about not pursuing a career in counter refinishing 😆I’m pretty lucky that my day job lets me write about the things I’m not so good at lol!
You may not be an interior designer, but you get extra points for determination, bravery and courage, and a damn good looking finished project! DIY for me starts with knee-knocking, moves on to reluctant determination, and ends with mutant bravery. Courage is a laughable pipe dream (I know nothing about plumbing). Seriously though, I admire you for kicking some formidable counter ass. Encore?
Haha well thank you Jill!! Your support is much appreciated! I’m sure I’ll have another DIY misadventure post at some point 😊
Great idea and great sense of humor!
This post inspired me to cover my ugly bathroom counter. Thank you!
That’s awesome! Best of luck with the project!
Budget Girl just redid her coffee table with that stuff! https://www.youtube.com/watch?v=cGlDusfJSx4&list=PLH0k0rlQA6DZktvhkKTlJbXLwEhc20CeL&index=7&t=0s
my bathroom sink is stained, what can I use to make it white again?
I’ve been thinking about how to redo a blue-gray counter in my van/RV. Everything is wood inside, so I’ve been leaning toward marble or butcher block (I’m the one person who doesn’t like granite or granite look). But I don’t know about replacing the whole counter myself, so this would be a great way for me to get a marble look, try it out to see if I like it, all with low cost and no commitment!
Wow. I have seen self adhesive wallpaper and I have had manny many different thoughts and put myself off, but seeing your sink and u being honest about the problems etc you have spurred me on to get the wallpaper and give it a go. It looks great your sink. Amazing that something so simple as self adhesive paper could make such an amazing transformation. ❤️🇬🇧